Reindeer Mask Tutorial - Bonus Pattern Piece

Reindeer Mask Tutorial

Can you believe we’re halfway through November, moreover, that it’s only 5 weeks until the Silly Season starts?!  I can’t, but that’s mostly because I live in topsy turvy land these days.  I’ve been in Australia for 12 years now but I still can’t get used to Christmas and Spring occurring at the same time.  I really need those environmental clues of the Northern Hemisphere, the autumn leaves falling, the nights drawing in, the chill in the air, to get me into the christmas spirit.  I pine for snow and log fires, sledding and hot chocolate, mittens and hot water bottles.

That’s not to say that I don’t enjoy a hot christmas.  It’s a lovely holiday here, full of light and the joys of early summer.  Little girls in white dresses, cherries and stone fruit, seafood and cocktails, bright sunshine and cool breezes.  We throw open all the doors and lounge around in the garden, enjoying balmy evenings under twinkling fairy lights.

Nonetheless, I do find that it requires more of a conscious effort on my part to make December feel festive, and because I am determined that my children should find it as magical as I remember the holidays from my childhood being I tend to overcompensate by going all out with the decorations, music, christmas craft activities, and, of course, handmade gifts.

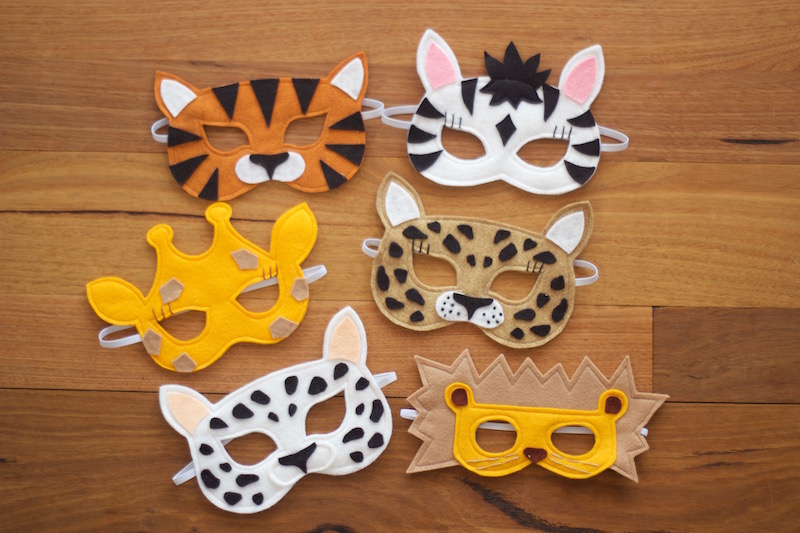
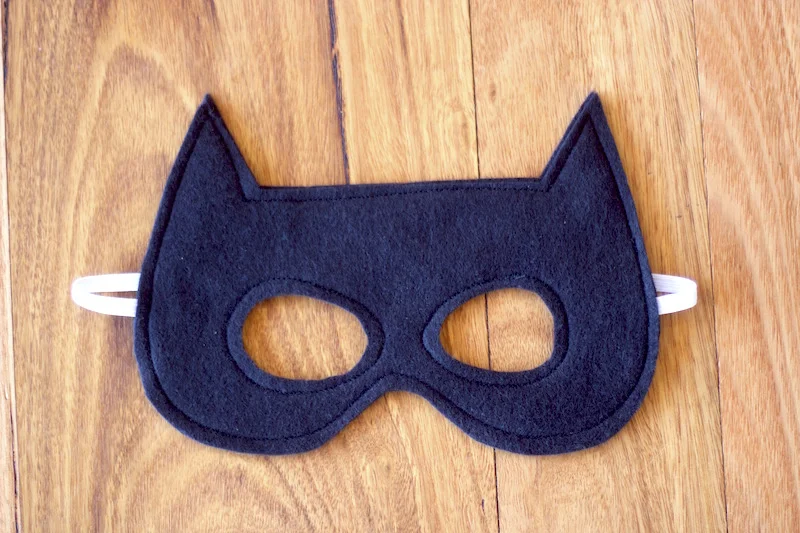
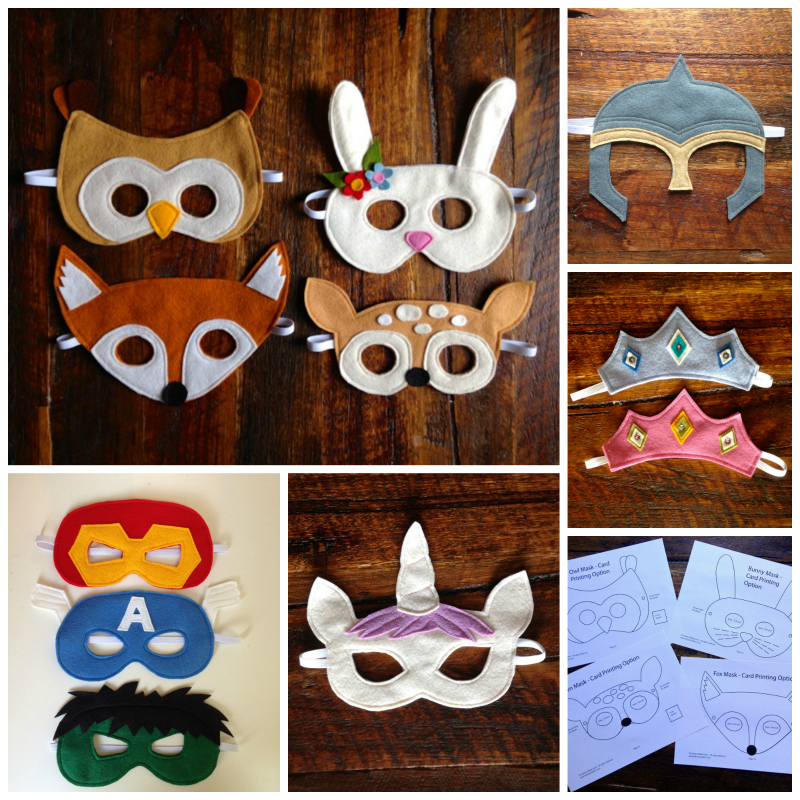
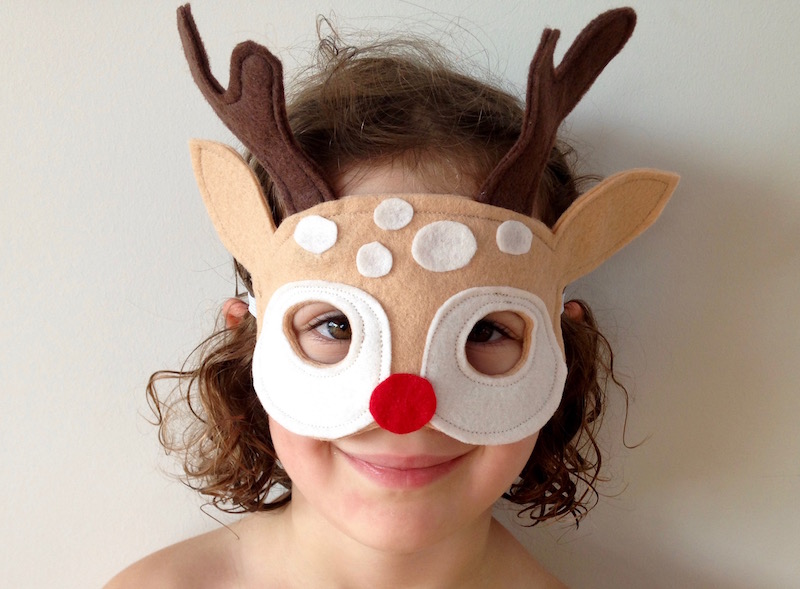
One of my favourite Christmassy things to make are these little Reindeer masks. I’m heading to Swagger Child Design Market this Sunday so I have been busy stocking up on them, and today I’m offering you a free pattern piece so that you can make them too.  The cute little fawn in my Woodland Creatures Sewing Pattern can be transformed into a festive Reindeer with the addition of these antlers.  Download the pattern extension piece here and scroll down for the tutorial.  If you don’t have a copy of the Woodland Creatures PDF and would like one then you can purchase it here.

Tutorial:

1. Download the bonus pattern pieces and print out.  Make sure that you set your print settings to 100% or select ‘no scaling’.  Measure the 1” square on the page to check that it has printed correctly.

2. Cut out the pattern pieces and pin them to a double layer of felt.  Cut around each piece and then sew the two layers together, sewing 5mm (¼”) from the edge.

Reindeer Mask

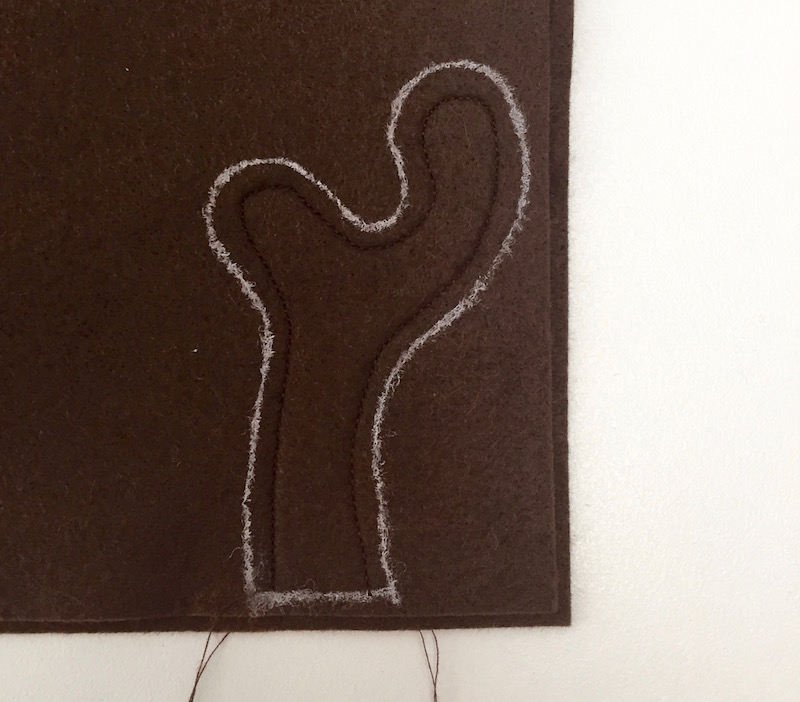
TIP:  For a neater finish and an easier time sewing, draw around your pattern pieces while they are pinned to the felt.  You will need a white marker or chalk pen to do this on the dark brown felt.  DO NOT cut the felt out.

Instead sew 5mm (1/4”) inside your drawn line and then cut along the white line once you have sewn the two layers together.

Doing it this way stops the felt from shifting as you sew which can be a particular problem when sewing around curves.

Reindeer Mask Tutorial

3. Sew your fawn mask following instructions on the PDF pattern.  When you come to sew the 2 layers of the face together, sandwich each antler between the 2 face layers, positioning each approximately 1cm (½”) from the ear, and letting the base of the antler extend at least 1.5cm / ¾” into the mask.  Pin in place before sewing around the face.

Reindeer Mask

As you can see I use the same technique for sewing all of my masks i.e. I sew before cutting wherever possible - It's quicker and gives a much nicer finish!

Well, that's it.  You're done!

Happy Holidays.

Reindeer Mask

An Eco Friendly Fabric Lunch Bag Tutorial (and Happy New Year!)

Eco Friendly Reusable Fabric Lunch / Snack bags | Free Tutorial from Willow & Stitch

Happy New Year!  It's been such a long time since I wrote anything here that it feels like I may have forgotten how!  I rather wore myself out at the end of last year sewing (what felt like) 1000's of dress up masks for Christmas markets. So; I've been taking a well earned break to relax and enjoy the summer, enjoy a visit from my Mum and get myself physically and emotionally prepared for my big girl starting school this week!  I can hardly believe she's starting school and I definitely can't believe the amount of things there are to do to get ready for it! There's uniform shopping, shoe shopping, choosing a bag, choosing a lunch box, labelling clothes, filling in forms, gathering paperwork, attending orientations, information evenings, play dates, etc etc etc... It's overwhelming and we haven't even started school yet!

Eco Friendly Reusable Fabric Lunch / Snack bags | Free Tutorial from Willow and Stitch

Since my world is so fully consumed with this 'starting school' business at the moment, it will probably come as no surprise that my first blog post and first tutorial of this year is a school related one.  I've been sewing up a big pile of these reusable fabric lunch bags to pop into Ella's lunchbox.  I thought they'd work really well for carrot and cucumber sticks. cheese and crackers. biscuits, grapes, apple slices etc.   I even made a couple of larger ones which will fit a sandwich so that I don't need to wrap it in cling film!

Eco Friendly Reusable Fabric Lunch / Snack bags | Free Tutorial from Willow and Stitch

Ella was really thrilled with her new snack bags - particularly the one with the Narwhale fabric - I think it would be fair to say that the thing she's looking forward to most about school is her lunch box (just like her mama that one - always thinking about what's to eat!)

These lunch bags are super quick and easy to sew and are perfect for using up small pieces of your favourite fabrics.  I lined them with some PUL which I had left over from my (failed) attempt to sew Modern Cloth Nappies - I'm glad it finally came in handy for something!  

Eco-Friendly Reusable Fabric Lunch bags - a free tutorial from Willow & Stitch

You will need: (for a medium sides snack bag)

18 x 37 cm (7 x 14.5") Cotton fabric

18 x 37 cm (7 x 14.5") Polyurethane Laminate (PUL) or similar waterproof fabric

12 cm (5") velcro

A Serger / Overlocker


How to make:

Decide on the size that you want your finished lunch bag to be.  Mine is going to be 16 x 16 cm. Calculate the sizes of the rectangles that you need for you bag:

The width of your fabric will need to be Width + 2cm,

The length will be (Length x 2) + 5cm. 

i.e for a 16 x 16 lunch bag:  Width = 16 + 2 = 18cm,  Length = (16 x 2) + 5 = 37cm

Cut one piece each of your cotton and your PUL and lay them on top of one another with the wrong side of the cotton and the right (non shiny) side of the PUL together.

Eco Friendly Reusable Fabric Lunch / Snack bags | Free Tutorial from Willow and Stitch

Serge along each of the short ends, sewing with a 1 cm seam allowance.

Eco Friendly Reusable Fabric Lunch / Snack bags | Free Tutorial from Willow and Stitch

Cut a piece of velcro which is 2 cm shorter than the finished width of the bag. Centre the loop (soft) side of the velcro 1 cm from the top (front) of the fabric, on the cotton side.  Sew right around the velcro twice for strength.

Centre the hook (rough) side of the velcro 1 cm from the bottom of your fabric, on the PUL side.  This will be folded up over the top to form the closure / flap.  Sew right around the edge of the velcro twice, remembering that this stitching will be visible from the front so use a coordinating thread and try to sew as neatly as you can!

Eco Friendly Reusable Fabric Lunch / Snack bags | Free Tutorial from Willow and Stitch

Fold the fabric so that the PUL is on the inside, and the front of the bag sits just under the velcro on the lining, like this:

Eco Friendly Reusable Fabric Lunch / Snack bags | Free Tutorial from Willow and Stitch

Serge along both side seams, beginning at the folded edge and continuing to the edge of the fold over flap.  Leave long tails on your cotton so that you can thread it into the seams to secure the ends like so:

Eco Friendly Reusable Fabric Lunch / Snack bags | Free Tutorial from Willow and Stitch

Hopefully your bags will be a little straighter than mine.  I guess that's what happens when you mix wine and sewing....!

Eco Friendly Reusable Fabric Lunch / Snack bags | Free Tutorial from Willow and Stitch
IMG_0994.jpg

Trim the loose threads and you're all done! 

You can make these in any size at all, make them tiny for a cute little snack of sultanas or make them huge as a wet bag for swimming things.  I always put one in my son's playschool bag to seal away soggy undies if he has an accident, or wet clothes after waterplay.  Use them instead of plastic bags to contain wet or dirty nappies which can then be disposed of when you get home.  

Eco Friendly Reusable Fabric Lunch / Snack bags | Free Tutorial from Willow and Stitch

I hope you found this tutorial useful.  What would you use your bags for?

You May Also Like..

A Free Batman Mask Pattern for you!

Free Batman Felt Mask Pattern | Willow & Stitch

Bam! Pow! Kaboom!  There have been a lot of superheroes racing around my house recently, rescuing dolls and dinosaurs in distress and generally causing well intentioned chaos.

I've been sewing an AWFUL lot of masks in the last month or so, stocking up my Etsy shop and preparing for the Christmas markets, and silly season in general.  I'm working on getting my second set of superhero mask patterns up in the Etsy shop soon, but in the meantime I thought you might like a little freebie!

Click here to download your FREE Batman felt mask sewing pattern.

The pattern can also be printed onto cardstock, painted, coloured or decorated and cut out - perfect for entertaining the kids on a rainy day or for children's parties.  Be sure to print the pattern at actual size - do not select scaling in your print options.

It's super easy this one; I don't have any photo illustrations for you but you won't need them! This mask should fit most children from around age 2.

You will need:

21 x 30cm (9 x 12") of high quality black felt

Approximately 31cm (12") of 8mm (3/8") wide woven elastic

Black thread

1.  Print the pattern piece and cut 2 mask shapes from your black felt.  TIP:  Draw around the insides of the eyes (with a white pencil or chalk) but do not cut them out yet. 

2.  Lay the 2 pieces one on top of the other, right sides together.  Pin in place.  Use a pin to mark the placement of the elastic on each side of the mask.  

3. Sandwich the elastic between the two layers of felt, pinning it in place so that it extends approximately 1.5cm (1/2") into the mask at each side.

4. Sew right around the outside of the mask, sewing through both layers of felt, and sewing 5mm (1/4") from the edge.  When you reach the spots where the elastic enters the mask sew backwards and forwards a few times to really secure it.

5.  Sew around the eye hole markings, sewing at least 5mm (1/4") from the white lines that you have drawn and keeping the lines INSIDE the circle that you are sewing. Take care not to catch the elastic in your stitches.

6. Cut along the white lines to reveal the eye holes. Again; take care with the elastic, this time making sure you don't cut through it! Cutting the eye holes out after you have sewn around them will give you a much neater finish.

Hope you and your little superheroes enjoy this tutorial.  I always love to see your creations if you feel like sharing them!

You May Also Like...

Say 'Hello' to Bonnie! (And to a free doll nappy / diaper pattern) 

Little Amigo Doll in a mini Geranium Dress | Willow & Stitch

This is Bonnie.  She's a 'Little Amigo' doll from Meg McElwee's 'Growing up Sew Liberated' book.  It's one of my favourite sewing books - so many lovely play things to make for your kids.  I think I might have made them all.... This is the third Little Amigo doll that I've made.  'Max' and 'Molly' are two of my kid's most loved toys.  Our sweet little friend, Brea, always makes a bee line for them whenever she's here too, so it was a bit of a 'no-brainer' when it came to her 3rd birthday present - she simply had to have one too. 

For some reason I always feel compelled to make dolls in the image of the child that they're for - they're always thrilled when they notice that the doll has hair 'just like me!' and eyes 'just like mine!'  

I dressed Bonnie in a miniature Geranium Dress from Made-by-Rae and made her a necklace of tiny colourful pompoms.  She came with a little note which read:

Hello Brea,

My name is Bonnie.  I like cuddles and tea parties.  Will you look after me please?

Xx

P.S. Happy Birthday!

Little Amigo Doll in a mini Geranium Dress | Willow & Stitch

And of course no doll is complete without a set of nappies.  I made 3 so that she can have plenty of changes / coordinate her nappy with her outfit.  They are very quick and easy to make and a fantastic way to use up scraps.  Click on the image below to download your pattern pieces.

Free Doll Nappy / Diaper Pattern and Tutorial | Willow & Stitch

This nappy will fit a doll with a waist of up to 35 cm (14") down to about 21 cm (8").  For reference this doll is 45 cm (18")

You will need:

33 cm x 30 cm (13" x 12")  Cotton

33 cm x 30 cm (13" x 12")  Towelling / Fleece / Microfibre lining

2 x 2.5 cm (1") pieces of Velcro (optionally more for smaller sizes - see note on sizing at the end)


Instructions:

Cut 1 piece each from the cotton and from the lining.  Lay them one on top of the other with right sides together.

Free Doll Nappy / Diaper Pattern and Tutorial | Willow & Stitch

Stitch right around the edge of the nappy with a 1 cm (1/2") seam allowance.  Leave edges open between the notches on the long side of the nappy.

Free Doll Nappy / Diaper Pattern and Tutorial | Willow & Stitch

Clip corners and curved edges, taking care not to cut through your line of stitching.

Free Doll Nappy / Diaper Pattern and Tutorial | Willow & Stitch

Turn nappy to the right side using a knitting needle / chopstick to push out the corners.  Press, folding under the seam allowance at the turning hole.  Pin closed.

Free Doll Nappy / Diaper Pattern and Tutorial | Willow & Stitch

Edge stitch right around the nappy, sealing the turning hole as you go.  

Free Doll Nappy / Diaper Pattern and Tutorial | Willow & Stitch

Affix velcro to the nappy, placing the loops on the lining of the back (long) edge and positioning the velcro a few mm in from your edge stitching line.  Place hooks on the right (cotton) side of the nappy front (short edge) - again positioning them a few mm in from the edge stitching.  Sew all 4 pieces of velcro in place, sewing right around the edge twice for strength.

If you wish to make this nappy for a smaller doll than this one you will need to adjust the velcro accordingly.  The velcro loops on the back (lining) of the nappy can stay as above and then you can either sew a 16 cm (7") length of velcro right across the top of the front of the nappy, or you can cut a shorter length and simply sew a single piece in the middle of the top front of the nappy. 

Free Doll Nappy pattern and tutorial | Willow & Stitch

My kids will spend hours playing with their 'babies' and changing their nappies.  I'm always especially pleased when my little boy plays with 'Max' - his little amigo doll! I'm not sure why I love it so much, I think it's for the same reason that I love seeing my little girl playing with cars or playing superheros - It's always so nice to see them just enjoying what they're doing without any reference to gender stereotypes and with no preconceptions of that's a 'girl's toy' or a 'boy's game' and that's precisely how it should be - don't you think?  

You May Also Like...

Free Dribble Bib Pattern and Tutorial

This is another project from the Mama and Baby sewing book which I wrote for my sister last year.  I'm still working on getting it ready to publish online but thought I'd share some of the projects beforehand.  Check out my Tutorials page for more free patterns and tutorials.

This little cowboy style neckerchief is fantastic for keeping your baby’s clothes dry, particularly as wet t-shirts can cause chaffing and soreness on their little chins and chests. The soft jersey fabric is very absorbent and the folds catch all the dribbles.  When it gets too wet or dirty you can just pop on a new one without needing a whole outfit change.  These are quick and simple to make and are the perfect project for using up scraps. Click on the image above to download the pattern.

Many people are afraid of using stretch / knit fabrics – and I have to admit that I was one of them before I started playing around with them and discovered that they’re actually great to work with and really very easy once you understand a few basics.  If you're new to sewing with knits then I suggest you check out my 'Beginner's Guide to Knits'.

In any case, don’t panic, all you need to remember is not to stretch the fabric when cutting it (a rotary cutter and mat is perfect for this) and to use a ball point (stretch) needle for your sewing machine. A ball point needle (as the name suggests) is a needle with a slightly rounded tip, meaning that it can pass between woven fibres without cutting them and potentially causing runs in knit fabrics.


You will need:

25cm x 50cm of Jersey knit (you can up-cycle an old t-shirt if you like)

25cm x 40cm of fleece / bamboo / towelling or similar for backing.

2 press studs

Dribble bib pattern pieces - click on the image at the top of the page to download them. Pattern pieces include a 1cm (1/2") seam allowance.


Directions:

1. Cut 1 of the bib front from your knit fabric, and 1 of the bib back from your fleece or bamboo backing fabric. Be sure to transfer all pattern markings. Markings for press stud positions should be copied onto the RIGHT side of the bib backing.

Press and sew the pleats:

2. With the bib front right side up, fold bib right sides together so that one of the outer pleat markings is matched to the middle mark.  Pin through both layers of fabric where the mark is, then fold bib back to the right side to form a pleat. Press the pleat away from the centre of the bib and pin in place. Repeat for the other side of the bib. Baste along the top edge of the bib front to hold pleats in place.

Willow & Stitch | Free Dribble Bib Tutorial

Join the bib front and back:

3. With bib front and back right sides together, match central notches along the top edge of the bib. Pin in place. Next, match and pin the notches at the pointed tip of the bib (the bottom).  Now align the corners of the bib front and back and pin these in place.  Ease the knit fabric into place so that it matches the edge of the bib back, taking care not to stretch either piece as you do so and allowing the excess knit fabric to form gentle folds in the middle of the bib.  Continue pinning the top and side edges.

4. Using a ball point needle on your sewing machine, join the two pieces with a 1cm (1/2") seam allowance. Sew right around the big, leaving a 5cm (2") turning hole on one of the side edges and backstitching at either side of your turning hole to secure the stitches.

Clip seams and Topstitch bib:

5. Trim seams at corners and tip of bib to 5mm.  Clip seams every 2 cm along sides and top of bib, taking care not to cut through your line of stitching.  Do not clip seam allowance at your turning hole.

6. Turn the bib to the right side, using your fingers or a knitting needle / chopstick to push out the corners. Use your fingers to pinch seams along the edges and pin them in place. Allow your knit fabric to extend a few mm (1/8") past the bib backing so that if you look at the bib from the back you can see a very narrow band of the bib front right around the edge. This will give the bib a better shape by ensuring that the backing fabric is not stretched too tight which would cause the bib tip to curl upwards.

7. Topstitch 5mm (1/4") from the edge, right around the bib, closing the turning hole at the same time. Remove pins as you sew, taking them out just before you reach them to allow fabric to relax into shape.

Attach press studs:

8. Attach your poppers according to the manufacturers instructions. The pattern includes positions for 2 press studs so that you can adjust the size of the bib as your baby grows.

Free Dribble Bib Pattern | Willow and Stitch

Look at that dribble bib in action, soaking up all that goo - Isn't it a beautiful thing?!  Is there a dribbly baby in your life who needs one (or two or three?) of these?

You May Also Like...

Handmade Linen Bedsheets Tutorial - Part 1: Duvet Cover

Handmade linen bed sheets tutorial

Linen sheets. Everywhere I look recently I have been seeing linen bed sheets.  And they just look so wonderful, so soft, so cozy, that I have been craving a set for months.  But at over $400 a set it's just not going to happen.  So; when I saw this gorgeous grey linen at my local designer clearance fabric store for $7 a metre I went a little crazy and bought 10 metres of the stuff.  

Sheets and duvet covers are basically just 2 squares sewn together right? How hard could it be? Well, the huge pieces of fabric are pretty tricky to handle but really it turned out to be not so difficult at all.  The main problem I found was that no fabric will be wide enough to enable you to use a single width which means that you always have to sew 2 or more pieces together and with a duvet cover that's supposed to be super cozy, you don't really want seams where you're going to feel them.

This was the solution that I came up with - a large top section with a smaller contrast piece at the foot of the bed.  Linen is great in that you can use it in either orientation which meant that I didn't have to have to sew any vertical seams which might be uncomfortable.

I sewed the duvet cover with french seams, which I haven't done before.  They're lovely, no doubt, but goodness me they didn't half keep on freaking me out.  Quite literally every 20 minutes I would have a minor heart attack thinking that I'd done it wrong!  Because of the amount of fabric involved this was probably the most expensive thing I've ever sewn - hence the jumpiness I suppose!  

I was about to say that I'm not entirely sure the french seams were worth the extra stress since I'm never really going to see the inside of the duvet cover; but since I was moaning only a few days ago about how much I hate changing bed covers and how I always end up inside them trying to figure out what on earth has gone wrong, perhaps that isn't true!  Still, I can confidently say that no-one ELSE will end up inside my duvet cover and therefore the french-ness or lack thereof of my seams can remain entirely up to me!  Suffice to say that I think next time I wouldn't bother.

Still, all's well that end's well and I'm so pleased with how this came out.  I quite literally cannot wait to jump into bed tonight!

Handmade linen bed sheets tutorial

If you'd like to sew your own, here is how I did it (in a nutshell).  Instructions include sewing a french seam to join the two front and the two back pieces together, but regular seams everywhere else for ease.


You will need:  (For 1 duvet cover and 2 pillow cases)

6 (or 7 for a king) x 20mm (approx) buttons

430cm (Queen) / 470cm (King) each of 2 different coloured linens (150cm wide)

Cut each piece in half to give two 215cm (235cm) long pieces of each linen.

Take one of these pieces and cut it in half along the length to give two 75cm x 215cm (or 235cm) strips of fabric.  Set one of these aside, we will use it later to make the pillow cases.  Repeat for the contrasting fabric.


Sew the Duvet:

Align the long edges of one full width piece and one contrasting half width piece.  Place WRONG sides together and join, sewing with a 1cm seam.  

Trim the seam to 5mm then press open.  Fold the fabric along the join so that the seam is hidden between the two layers of fabric and the RIGHT sides are now together. Press.  

Sew along the joined edge, sewing a presser foot's width (7-8mm) from the edge and so enclosing the raw edges of the join in your new seam.

NOTE: Unless you are sewing with printed linen, you very likely don't have a right and a wrong side to your fabric (I think this is one of the reasons that I found it all so confusing!) Just remember that once you have sewn your french seams, you WILL have a right and a wrong side. (the wrong side is the one where you can see the french seam.)

Press the seam allowances towards the foot of the duvet (towards the shorter strip of contrasting fabric) and then, from the right side, topstitch along the seam - sewing through the hem, a few mm from the join.

Repeat to join the two back pieces of the duvet cover.

Find a large expanse of floor and lay out your duvet front and back pieces on top of one another, with RIGHT sides together.  Pin along the top edge and both sides.  Sew these seams with a 1.5cm seam. Finish seams with an overlocker or a zigzag stitch.

Hem the duvet by pressing 1cm to the wrong side right around the open mouth at the base of the duvet.  Press another 2cm to the wrong side and pin in place.  Sew right around the base of the duvet.

Place a button every 30cm along the hem to close the duvet cover.  (If you have sewn a king size duvet cover, place the buttons every 30cm, starting and ending 10cm from each edge.)

Handmade linen bed sheets tutorial

Next up - Part 2: Sewing the pillow cases.

You May Also Like...

Tutorial: How to lengthen pants by adding a cuff.

How to add a cuff to pants

This is a great way to get a little more wear out of pants which have become too short.

1.  Measure the width of the pant leg.  Multiply by 2 and then add 2 cm (or 1") for the seam allowances.

e.g. Width is 10 cm:  (10 x 2) + 2 = 22cm

OR Width is 4": (4 x 2) + 1 = 9"

2.  Decide on the length of the cuff that you want to add.  5 cm (2") is a good size if you are unsure.  Multiply by 2 and then add 2.5 cm (1 1/4") for the seam allowances.

e.g. Cuff length will be 5cm:  (5 x 2) + 2.5 = 12.5 cm

OR Cuff length will be 2":  (2 x 2) + 1 1/4 = 5 1/4"

3. Cut 2 pieces of fabric in your required size.  For the example above you will need to cut 2 pieces which are 22 cm wide and 12.5 cm high. (OR 9" wide and 5 1/4" high)

4. With wrong sides together, fold each cuff along it's width, bringing long edges together. Press, then open up again.

How to add a cuff to pants

5. If your fabric has a directional print then take the bottom edge and press 1 cm (1/2") to the wrong side. Once pressed, open up again.

How to add a cuff to pants

6. Fold each of the cuff pieces in half along the length, bringing short edges and right sides together.  Sew along the short edges with a 1 cm (1/2") seam allowance to form 2 tubes.  Press seams open.

How to add a cuff to pants

7. Re-fold and re-press the 1cm (1/2") which you pressed to the wrong side along the bottom edge in step 5.

How to add a cuff to pants

8. Take one of your cuff tubes and, with right sides together, slide it over one of the pant legs, aligning one of the raw edges of the cuff tube with the base of the pant leg.  Align the side seam of the cuff with the in-leg seam of the pants. 

How to add a cuff to pants

9. Sew right around the bottom of the pants, joining the two pieces with a 1.5 cm (3/4") seam.  You should be sewing just above the original hem of the pants.  If your pant legs are too skinny to fit over the arm of your sewing machine, try sewing from the inside, like this:

How to add a cuff to pants

10. Fold the cuff down to the right side and press the seam allowance towards the bottom of the pants.

How to add a cuff to pants

11. Turning the pants to the wrong side, fold the pants cuff up along the pressed fold.  Pin in place, ensuring that the folded edge of the cuff extends about 0.5 cm (1/4") past the seam joining the cuff to the pants.

How to add a cuff to pants

12.  From the right side of the pants, 'stitch in the ditch' of the join between the cuff and the pants, making sure that you catch the inner edge of the cuff in the underside of your stitches.  I have done this in white so that you can see what's going on but you will want to match the fabric of your pants legs.  Again, if the leg of the pants won't fit over your sewing machine arm, you may need to do this by turning the pants to the wrong side and sewing from the 'inside' of the leg.

How to add a cuff to pants

This is also a really nice technique if you simply want to add some interest to a pair of plain pants.  Even if the pants don't need to be lengthened, sew exactly as above and turn up the cuffs so that when your child grows you can simply fold them down for extra length.

I hope you have found this tutorial useful.  Do you have any favourite tips for getting a little more wear out of your clothes?

You May Also Like...

Thursday Tee (or another Tuesday Tee)

I haven't been feeling all that well today so I thought I wouldn't try to stretch myself too far. So instead of coming up with a new Tee, I went and made another Tuesday Tee. I couldn't help myself, I just love this Tee so much it's so comfy and fits really well.  I did however manage to get the pattern up for you this time.  You can find the link here.

Please note that this pattern is untested by anyone except me and is one size (small) only.  If you make this Tee I would be very grateful of any feedback so that I can improve the pattern for the next person.

For this second Tuesday Tee I sewed the Hems with a zigzag stitch instead of a twin needle. Let's say that I did this to show you that it looks just as good and not because I couldn't be bothered to fit the twin needle and wind another bobbing of lemon coloured thread! Okay?!

I also topstitched the back seam this time.  I think it looks great with the added detail.

Monday Tee Tutorial

I'm really pleased with this tee.  It's such a simple style, but I do love the shape.  It has a lovely neckline, dropped shoulder seams, tapered waist and perfectly cosy long sleeves.

First of all, let me please state that this pattern is untested by anyone except for me!  It is also a single size pattern, approximately size Small.  The bottom is quite tightly fitted and will fit those with a high hip measurement of approximately 92cm / 36".  The rest of the pattern is quite a relaxed fit however so if you wanted to have a go and just increase the width at the bottom a little to fit then I think it would probably work pretty well.

Download the pattern pieces by clicking on the image above. Printing Instructions can be found on page 12.

For tips on sewing with knits click here

Sorry for some of the poorly lit diagrams below - the only time I really get a chance to sew is once the kids are in bed!

You will need:

  • 1.4m of knit fabric
  • Coordinating Thread
  • Twin needle (optional)
  • Rotary cutter and mat (optional)

Monday Tee Sewing Instructions:

Hem Pieces:

Hem the sleeves and the bottom edge of the front and back pieces.  Fold 1cm to the wrong side and press.  Fold another 1.5cm to the wrong side and press again.  Pin in place.  Stitch the hem with a zig-zag stitch or with a twin needle, sewing 1.2cm from the edge. 

IMG_2621.jpg

 Join the front and back:

Lay the Tee main front and back pieces on top of one another, with right sides together and align shoulder seams.  Join with a 1cm seam.  Press seam open, or if you have serged your seam, press it towards the back of the Tee.

Join the sleeves:

Pin sleeves in place, placing sleeve and body of tee right sides together and aligning centre notches of sleeves with shoulder seams.  Join with a 1cm seam. Repeat to join second sleeve.

Sew Underarm Seams:

Fold tee so that right sides are together and join the underarms and sleeves in one long continuous seam.  Pin in place first and make sure that the wrists, hem and underarm seams all match.  Begin stitching at the wrists and sew towards the bottom hem. 

Finish Neckline.

To finish the neckline, cut a piece 67cm long and 4cm wide.  Fold along it’s width, aligning short edges and placing right sides together. Join the ends with a 1cm seam. Press seam open.

Fold the neck binding in half along it’s length this time with wrong sides together. Press.

IMG_2624.jpg

Pin the neck binding to the neck of the Tee, right sides together and placing the seam of the binding at the centre back of the neck.  You will need to stretch the neck binding slightly as you pin to make it fit.  This helps the neckline to sit nicely without puckering.

Join (sew or serge) the binding to the neck of the tee, sewing with a 1 cm seam.  Fold binding over to the right side and press. 

And you're finished!

I hope you have had fun with this tutorial and that you love this tee as much as I do.  Please feel free to get in touch if you have any questions - I always love to hear from you!