Drape Drape 2 - Asymmetrical Scoop Neck Tee: Pattern Review

Drape Drape 2 - Asymmetrical Scoop Neck Tee: Pattern Review |  Willow & Stitch

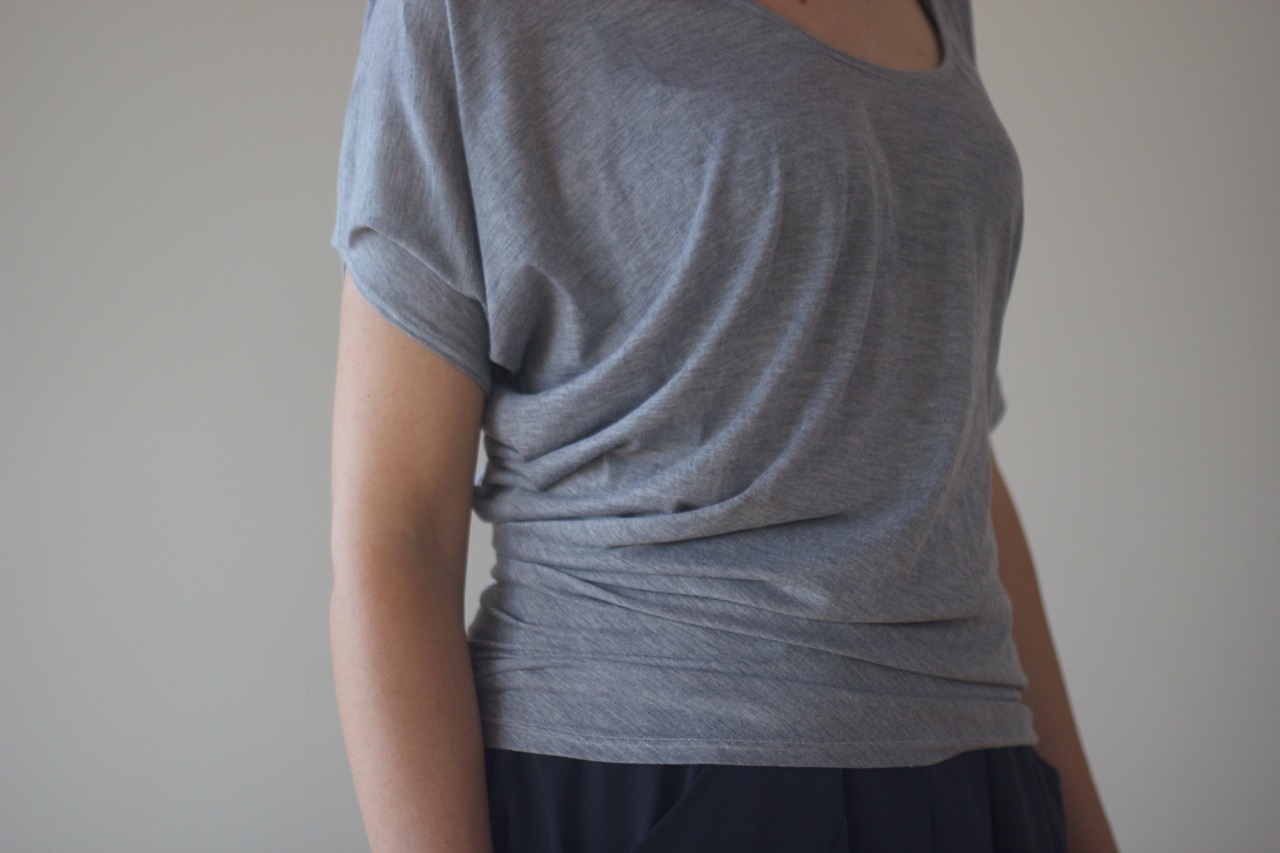
I've been flouncing around the house today in my favourite new me-made.  I am completely in love with this Asymmetrical Scoop Neck Tee from Drape Drape 2.  Despite having borrowed the original Drape Drape book from my friend about a year ago, I hadn't got around to making anything from it yet so this was the first of Hisako Sato's pattern's that I have actually worked with.  If I'm honest I had flicked through the first book and felt a little bit intimidated by (what appeared to be) some very fiddly patterns and hadn't managed to find the time, or the enthusiasm, to tackle any of them.  

BUT.  Then I saw a picture of this tee on Instagram and impulsively bought Drape Drape 2 purely so that I could make one.  I'm really glad I did.  It was the perfect first pattern to start with.  Ridiculously simple (It's just a single pattern piece) but with some really lovely details.  I love the way the fabric drapes at the waist and I particularly like the shape of the fitted sleeve on the right side.  The left sleeve is loose and the shoulder has a lapped seam which just looks really nice.  The neckline is lovely, if a little wide - certainly not ideal for grovelling around on the floor picking up toys / shoes / bits of banana. Unless, of course, you happen to be wearing a particularly lovely (handmade?) bra that you want to show off.  But let's face it, if you're grovelling around on the floor cleaning up discarded bits of old banana no one's really going to fancy you anyway, even if you are flashing your pretty undies at them. Probably best to just save this tee for a civilised evening with friends once the kids are in bed.

Drape Drape 2 - Asymmetrical Scoop Neck Tee: Pattern Review |  Willow & Stitch

One more thing I should mention about this book is the sizing.  I know it's a Japanese pattern book, but still, I can't pretend my ego wasn't slightly dented by the fact that I was measuring as a size XL when I usually wear a small or medium!  I can't help but wonder how many people have bought the book and then discovered that nothing much will fit them.... Of course you'd probably all have the sense to check things like that, rather than just buying a book of patterns on a mere whim like I did...

Still, there are at least 3 other patterns in this book that I'm dying to try and on the whole I like Drape Drape 2 much more than Drape Drape 1 - there seem to be many more wearable items in it, although to be honest several of them would still be pretty obscenely revealing if wore them like the models in the book do (i.e. without anything underneath). I think layering is going to be key...  But that's a problem for another day and in the meantime I'm going to continue crushing on my new tee and flouncing around the house.  

Drape Drape 2 - Asymmetrical Scoop Neck Tee: Pattern Review |  Willow & Stitch

You May Also Like...

Our Favourite Playdough Recipe

playdough

Today was a playdough kind of day.  Everyone was a little bit grumpy, everything was turning into an argument and we were on a downwards spiral.  So we made playdough, and as is often the case, everything began to turn around.  The kids love measuring out the ingredients, choosing colours and scents and kneeding the warm dough.  The kneeding is like a kind of therapy, It slows your heart and deepens your breathing. And then of course there are the endless play possibilities.  

This is our favourite playdough recipe.  It's quick and easy and makes beautiful silky soft playdough which will keep for months in an airtight container.


Ingredients:

2 cups plain flour

1 cup salt

1 tablespoon cream of tartar

1 tablespoon of oil

2 cups of water

Add all the dry ingredients to a saucepan.  Add the water and heat, stirring continuously until the mixture begins to thicken and pull away from the sides of the pan.  It can get to be a pretty good arm workout but continue to heat and stir for another minute or so.

Tip contents out onto the work surface, allow to cool a little and kneed until smooth.

playdough

Variations

Colour:  If you want to make only one colour, you can add a few drops of colouring to the water at the start.  If you want to make a couple of different colours then add the colouring to the dough once it has cooked and you have portioned it.

Scent:  I love adding essences to playdough to make it a truly sensory experience.  This time we added a teaspoon of coconut essence, but try adding lavender oil for a calming experience, or a tablespoon of coco powder (although that does increase the chance that the little ones are going to try to eat it!)

Sparkles:  Add a tablespoon of glitter to the dough.  Ella's favourite version of playdough is blue with silver sparkles - unsurprisingly she calls it 'Elsa playdough'.

Do you have a favourite playdough recipe?  Do you go for a cooked or no cook recipe?  Have any fun variations?

You May Also Like...

Awesome Knee Patch Tutorial

Knee Patches

Little boys.  They are amazing in so many ways.  I love their enthusiasm and their exhuberance.  It has it's downsides though.  Like bruises, bumped heads and worn knees and ALL their pants.  I've had a huge stack of jeans sitting in my mending pile for weeks now and today I finally got around to patching them.  

This is my favourite patching method for pants.  It's quick, it's easy, there's lots of room for being creative and best of all you don't even need a sewing machine.  I don't know if you've ever tried, but it's actually really difficult to use a sewing machine to patch little boy's pants.  The legs of them are so slim that they often won't fit over the arm of your sewing machine and even if they do, there certainly isn't room for turning corners.  

This method uses double sided fusible interfacing and a bit of good old fashioned hand stitching.

You will need:

Approx 6 x 4" fabric

Approx 6 x 4" double sided fusible interfacing

Embroidery thread and needle

Iron


Start by measuring the size of the area that you want to patch.  

Knee Patch Tutorial

Cut 2 rectangles of fabric to size and lay them onto one side of the fusible interfacing.  Press using a hot, dry iron to fuse.  Leave the paper backing on the interfacing and draw the shape of your patch on the paper.  Trim to shape and repeat for the second patch.

Knee Patch Tutorial

Remove the paper from the second side of the fusible interfacing and position on the pants over the hole.  Iron the pants before doing this so that you don't get a lumpy finish.

TIP: Slide the paper from the fusible interfacing inside the pants leg so that the interfacing will not bond to the back of the knee at the site of the hole.

Iron the patches to fuse them in place.

Knee Patch Tutorial

Take a needle and embroidery thread in complementary or contrasting colour and sew right around the edges of the patch to secure it in place.  

Knee Patch Tutorial
Knee Patch Tutorial
Knee Patch Tutorial

If you don't do this step you will find that after a few washes the patch begins to peel away from the pants. Also it's a lovely way to add detail.  The quickest way to do this is with a simple running stitch but you can get creative and try something different.  This version with embroidered crosses is one of my favourite.

Knee Patch Tutorial
Knee Patch Tutorial

Don't be put off by the hand stitching.  I know lots of people hate it, but it an be a lovely, relaxing thing to do. Get yourself a cup of tea and put your feet up.  Find your happy place.

Knee Patch Tutorial

Even the cats can get involved.. I really don't know what it is with this one.  She just has to be wherever my focus is.  It's very cute but makes life a little difficult sometimes...!

Knee Patch Tutorial

Do your kids wear out their clothes?  Do you have a favourite method for patching pants?

You May Also Like...

Handmade Linen Bedsheets Tutorial - Part 1: Duvet Cover

Handmade linen bed sheets tutorial

Linen sheets. Everywhere I look recently I have been seeing linen bed sheets.  And they just look so wonderful, so soft, so cozy, that I have been craving a set for months.  But at over $400 a set it's just not going to happen.  So; when I saw this gorgeous grey linen at my local designer clearance fabric store for $7 a metre I went a little crazy and bought 10 metres of the stuff.  

Sheets and duvet covers are basically just 2 squares sewn together right? How hard could it be? Well, the huge pieces of fabric are pretty tricky to handle but really it turned out to be not so difficult at all.  The main problem I found was that no fabric will be wide enough to enable you to use a single width which means that you always have to sew 2 or more pieces together and with a duvet cover that's supposed to be super cozy, you don't really want seams where you're going to feel them.

This was the solution that I came up with - a large top section with a smaller contrast piece at the foot of the bed.  Linen is great in that you can use it in either orientation which meant that I didn't have to have to sew any vertical seams which might be uncomfortable.

I sewed the duvet cover with french seams, which I haven't done before.  They're lovely, no doubt, but goodness me they didn't half keep on freaking me out.  Quite literally every 20 minutes I would have a minor heart attack thinking that I'd done it wrong!  Because of the amount of fabric involved this was probably the most expensive thing I've ever sewn - hence the jumpiness I suppose!  

I was about to say that I'm not entirely sure the french seams were worth the extra stress since I'm never really going to see the inside of the duvet cover; but since I was moaning only a few days ago about how much I hate changing bed covers and how I always end up inside them trying to figure out what on earth has gone wrong, perhaps that isn't true!  Still, I can confidently say that no-one ELSE will end up inside my duvet cover and therefore the french-ness or lack thereof of my seams can remain entirely up to me!  Suffice to say that I think next time I wouldn't bother.

Still, all's well that end's well and I'm so pleased with how this came out.  I quite literally cannot wait to jump into bed tonight!

Handmade linen bed sheets tutorial

If you'd like to sew your own, here is how I did it (in a nutshell).  Instructions include sewing a french seam to join the two front and the two back pieces together, but regular seams everywhere else for ease.


You will need:  (For 1 duvet cover and 2 pillow cases)

6 (or 7 for a king) x 20mm (approx) buttons

430cm (Queen) / 470cm (King) each of 2 different coloured linens (150cm wide)

Cut each piece in half to give two 215cm (235cm) long pieces of each linen.

Take one of these pieces and cut it in half along the length to give two 75cm x 215cm (or 235cm) strips of fabric.  Set one of these aside, we will use it later to make the pillow cases.  Repeat for the contrasting fabric.


Sew the Duvet:

Align the long edges of one full width piece and one contrasting half width piece.  Place WRONG sides together and join, sewing with a 1cm seam.  

Trim the seam to 5mm then press open.  Fold the fabric along the join so that the seam is hidden between the two layers of fabric and the RIGHT sides are now together. Press.  

Sew along the joined edge, sewing a presser foot's width (7-8mm) from the edge and so enclosing the raw edges of the join in your new seam.

NOTE: Unless you are sewing with printed linen, you very likely don't have a right and a wrong side to your fabric (I think this is one of the reasons that I found it all so confusing!) Just remember that once you have sewn your french seams, you WILL have a right and a wrong side. (the wrong side is the one where you can see the french seam.)

Press the seam allowances towards the foot of the duvet (towards the shorter strip of contrasting fabric) and then, from the right side, topstitch along the seam - sewing through the hem, a few mm from the join.

Repeat to join the two back pieces of the duvet cover.

Find a large expanse of floor and lay out your duvet front and back pieces on top of one another, with RIGHT sides together.  Pin along the top edge and both sides.  Sew these seams with a 1.5cm seam. Finish seams with an overlocker or a zigzag stitch.

Hem the duvet by pressing 1cm to the wrong side right around the open mouth at the base of the duvet.  Press another 2cm to the wrong side and pin in place.  Sew right around the base of the duvet.

Place a button every 30cm along the hem to close the duvet cover.  (If you have sewn a king size duvet cover, place the buttons every 30cm, starting and ending 10cm from each edge.)

Handmade linen bed sheets tutorial

Next up - Part 2: Sewing the pillow cases.

You May Also Like...