
A Beginner's Guide to Sewing With Knits
/
I am going to be doing a lot of selfish sewing this week and am hoping to be able to get a couple more free patterns up for you at the same time (yay!). But since most of them are going to be Tees I thought that it might be helpful to write a guide to sewing with knits for those of you who would like to try these patterns but are just TERRIFIED OF SEWING WITH KNITS!
Okay? So here we go:
The first point to make about sewing with Knits is that it is NOTHING TO FREAK OUT ABOUT! I used to have such a fear for sewing with knits until one of my lovely friends who has taught me a lot about sewing, gently pointed out that this was a completely irrational fear and very kindly guided me through my initial panic. I have to say that she was right and knits are now one of my favourite things to sew. A few simple techniques are all you need to get started and the best way to learn is to just go for it! Buy some cheap fabric that you are not scared to ruin and just start sewing. It won’t take you long to figure it out and it is so worth investing the time to learn because once you feel confident you will find a whole new world of sewing opens up to you. (That was my experience anyway!)
Second important point: YOU DO NOT NEED A SERGER / overlocker to sew these tees. I am lucky enough to have one so I often use it but it is definitely not compulsory. You can easily sew every one of these tees with a sewing machine and they require no specialist techniques.
One thing you do need however is a STRETCH OR BALLPOINT NEEDLE. Stretch needles have a slightly rounded tip so that they will slide into the gaps between threads in your fabric, rather than cutting through the threads (as a sharp needle could do) which can result in runs and holes in you fabric (exactly as it would in stockings / pantyhose).
Cutting Pattern Pieces:
When cutting out pattern pieces from a knit fabric it is best to USE A CUTTING MAT AND ROTARY CUTTER if you have one. Using a mat allows you to lay your fabric flat and ensures that it will not stretch and become misshapen as you cut it. This can easily happen when using scissors as you have to lift the fabric in order to be able to cut it.
TIP: A rotary cutter with a smaller diameter blade is useful for cutting around tighter curves or corners.

When sewing with knit fabrics, often the SEAM NEEDS TO BE ABLE TO STRETCH along with the fabric. If you just sew a straight seam you run the risk of either not being able to put on your garment or of the seam thread snapping. There are several ways to achieve a seam which can stretch:
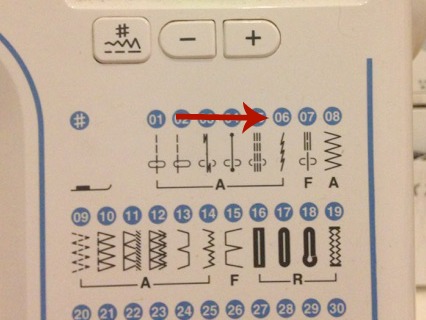
1. USE A STRETCH STITCH: Many sewing machines have a stretch stitch. The one on my sewing machine looks like this: (#6)
2. USE A ZIGZAG STITCH: If your sewing machine doesn’t have a specialist stretch stitch then you can use a simple zigzag stitch. If you don’t need a lot of stretch in your seam then you can make your zigzag quite narrow. If you need it to stretch a lot you will need to use a wider zigzag.
3. USE A SERGER / Overlocker. If you have a serger / overlocker you can use it to sew these seams. Serger stitches allow some stretching of the fabric and have the added bonus of tidying up the seam allowance at the same time.
Take a scrap of the fabric you are going to be working with and have a play with some of these stitches. Try stretching your stitching afterwards to see how it reacts.
HEMMING
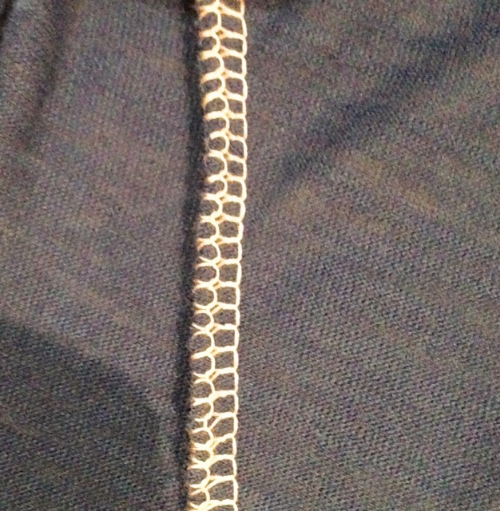
There are 2 main ways of hemming a knit garment. The simplest way is to use a zigzag stitch like this:

If you’re feeling a little more adventurous you could try using a twin needle which is the finish traditionally used for Tees, it looks like this:
Using a twin needle is nowhere near as complicated as you would imagine. Twin needles look like this and fit onto your machine in exactly the same way as an ordinary needle.

The only difference is that you need two spools of thread on top. On my Janome sewing machine I place the second spool (a bobbin) on the bobbing winder. I have used 3 different colours here for clarity.

Thread your sewing machine as usual, with both strands of thread together. When you get to the needle you will need to pass one thread through the usual guide and thread the left hand needle. Pass the second thread through a second guide to the right of the other, then through the second needle.

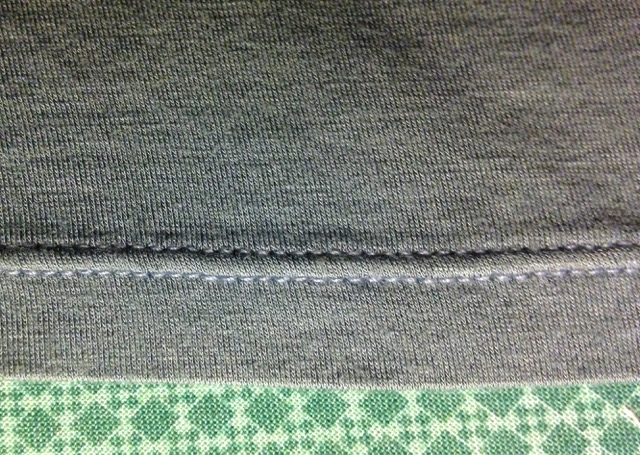
Set your sewing machine to an ordinary straight stitch and sew! (I usually increase my stitch length to about 3mm as I find it gives a neater finish). Your finished stitches will look like this from the right side:

And like this from the wrong side:

And I think that's pretty much all you need to know for the time being. I hope you have found this guide useful. If you need any more help then feel free to ask questions. There is also a lot of information out there on the big old inter-web so go and have a look around, then take a deep breath and JUST BEGIN. It'll be the best thing you ever did... (or one of them anyway!)


