Millie Dress International Blog Tour

Millie Dress in See You at Six French Terry

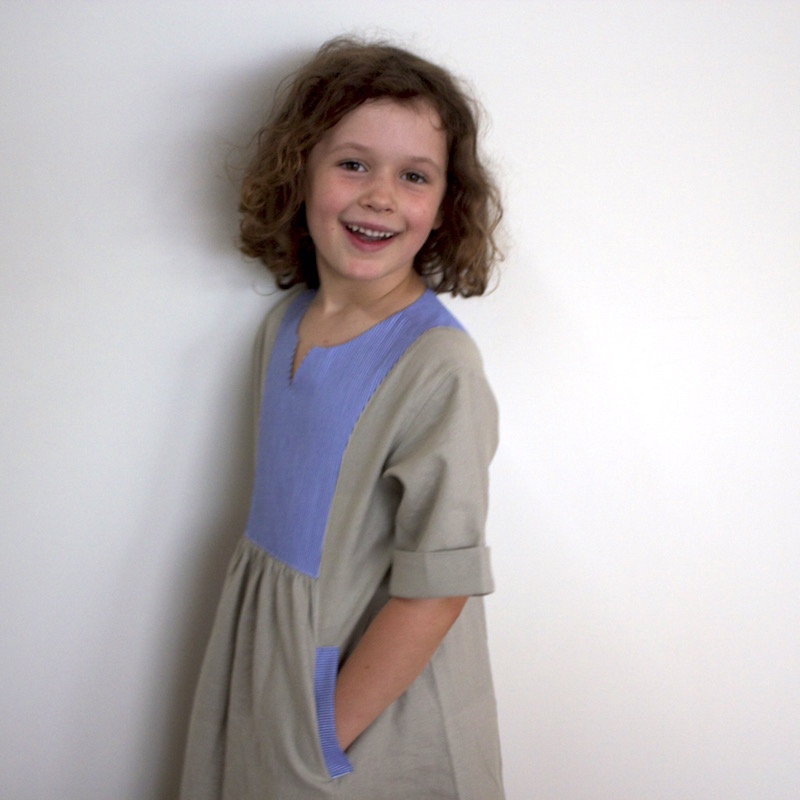
I've had my eyes on this beautiful Millie Dress pattern for a while now. I even went and downloaded the original version but my little beanpole of a girl outgrew the size range before I had a chance to make it.  Happily for me the lovely designer, Nicky of Mix it Make it, has updated the pattern and it now comes in sizes 2-12 - Hurrah!  When she asked whether I would like to be part of the international blog tour to celebrate the release of the English version of the pattern I quite naturally jumped at the chance! 

Millie Dress International Blog Tour

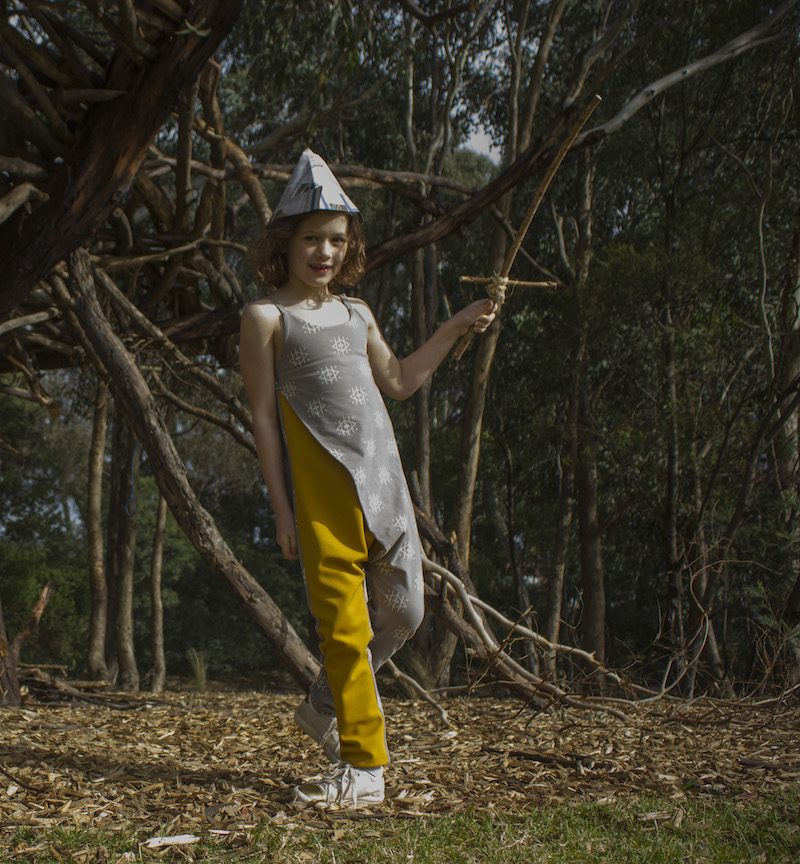
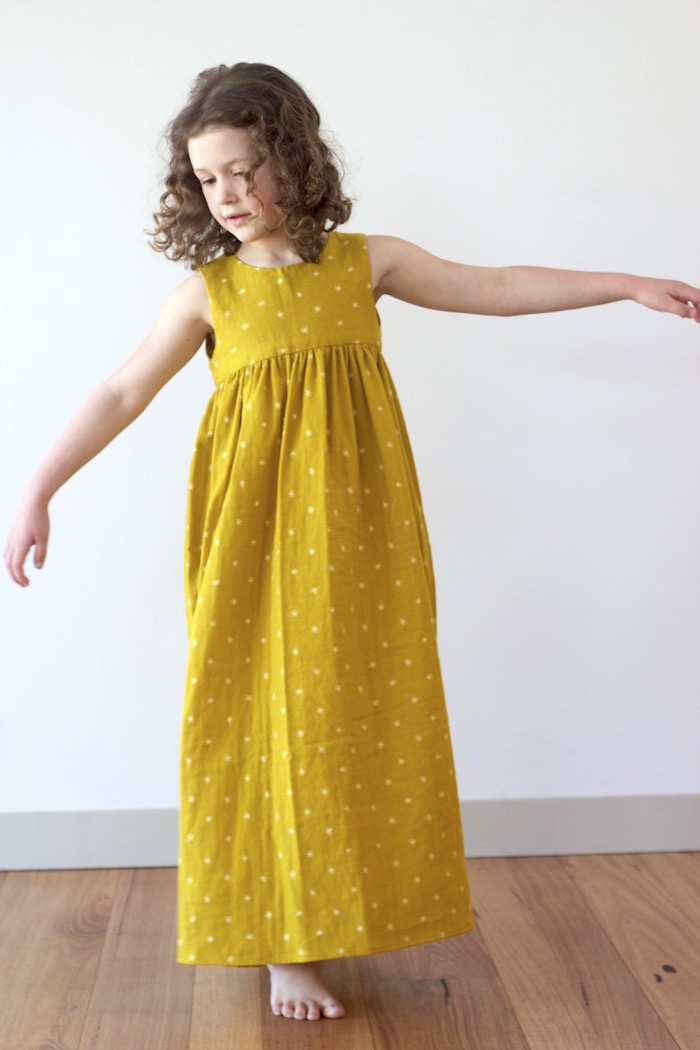
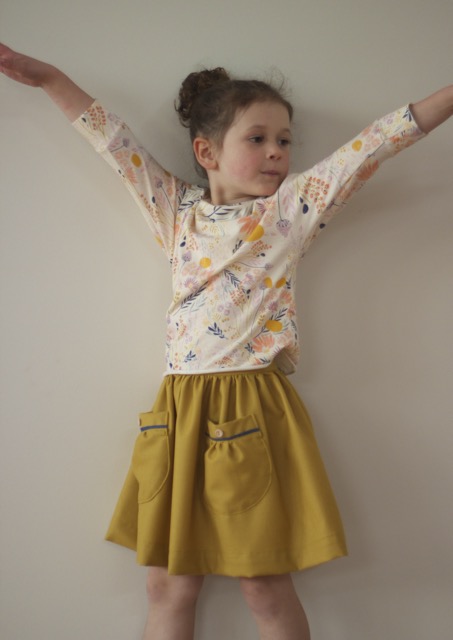
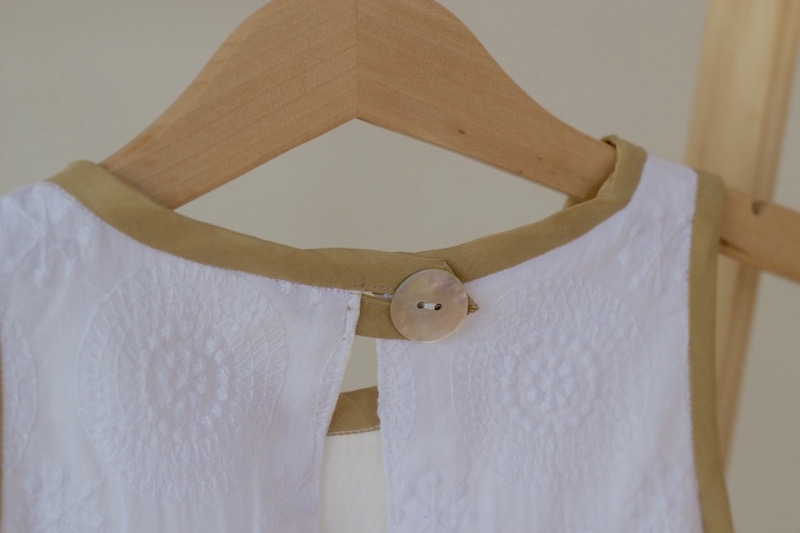
Summer is in full swing down under so I decided to hack my Millie Dress a little to make a sleeveless version.  It was a really simple alteration - I just turned the seam allowance to the wrong side and stitched it down, exactly the same as the neckline.  Super easy.

Millie Dress in See You at Six French Terry

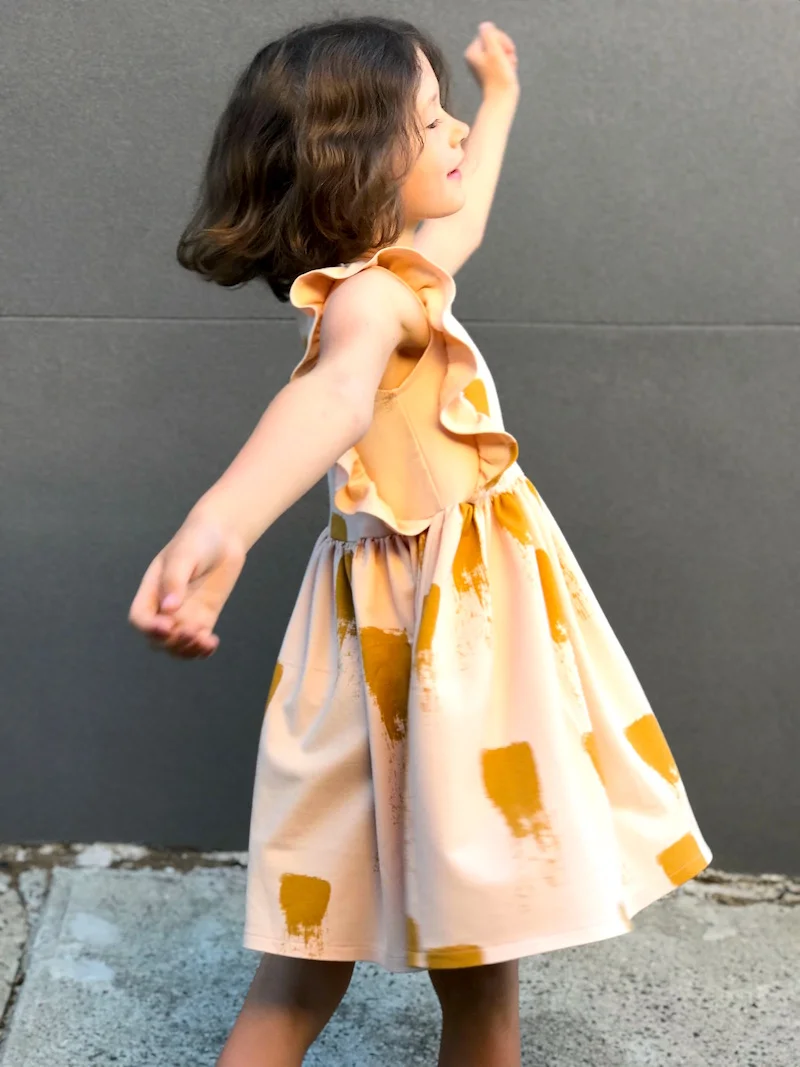
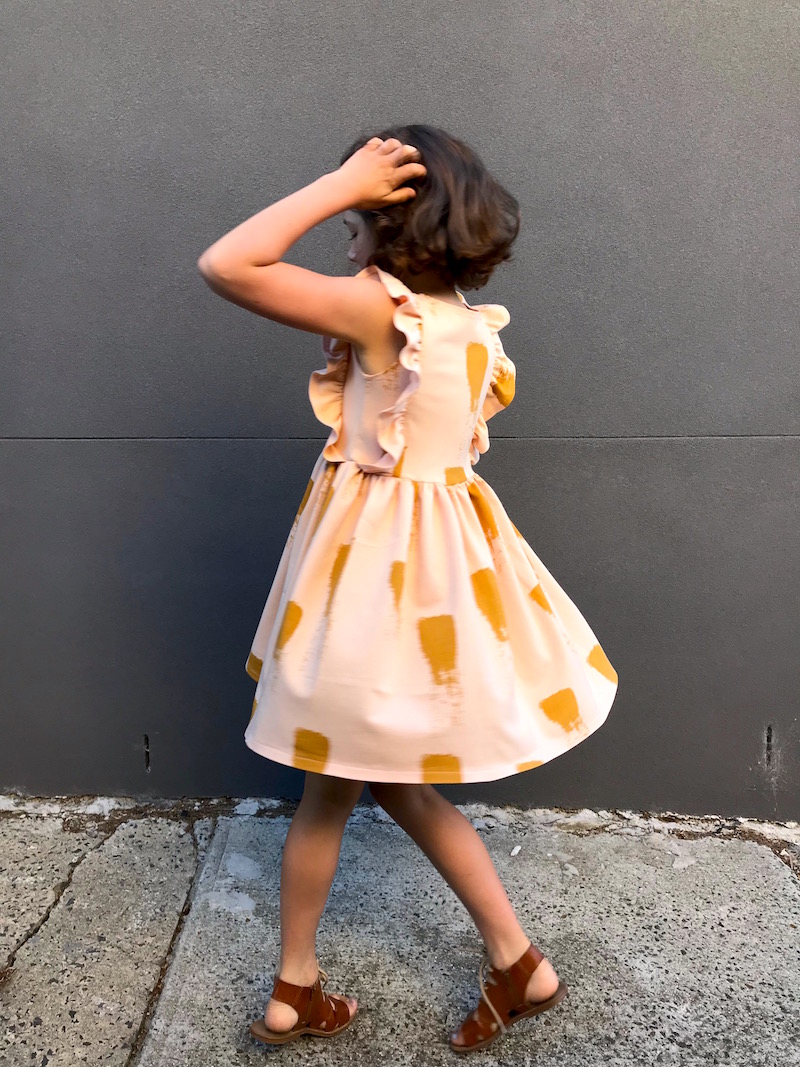
I used a beautiful soft See You at Six French terry which I have recently become completely obsessed with.  I blame MaaiDesign for introducing me to it and enabling my addiction!  It's just so lovely to work with and so heavenly to wear.  Each time I make something from it my kids put the clothes on and say 'Oooooh, yes! I love this one!'  I can't get enough of this beautiful pink with gold paint strokes on it.

Sleeveless Millie Dress in See You at Six French Terry

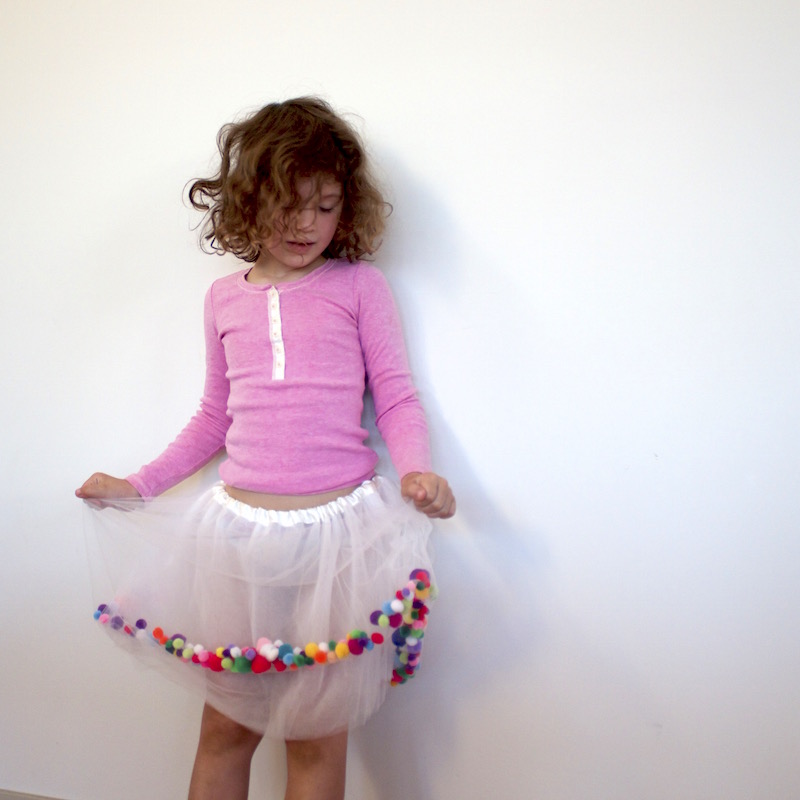
I think this may well be one of Ella's favourite things that I have ever made for her.  Pretty, Twirly, Comfy. What more could a girl want?  

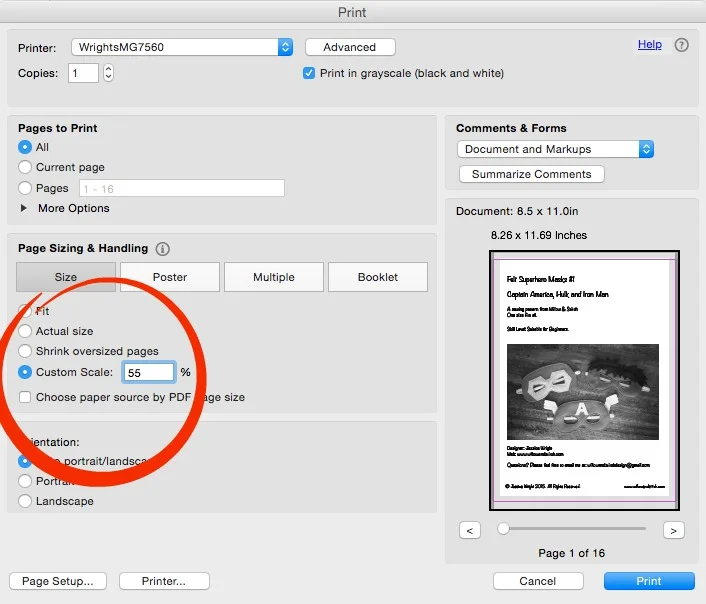
The pattern is beautifully drafted and the instructions are clear and simple.  I made the mistake of getting a little over excited and accidentally cut the front and back bodice along the ruffle insertion lines before joining them at the shoulders.  I spent about 2 minutes kicking myself and then decided to just try sticking them back together with washi tape before sewing and what do you know - it worked a treat!  Washi tape for the win every time!

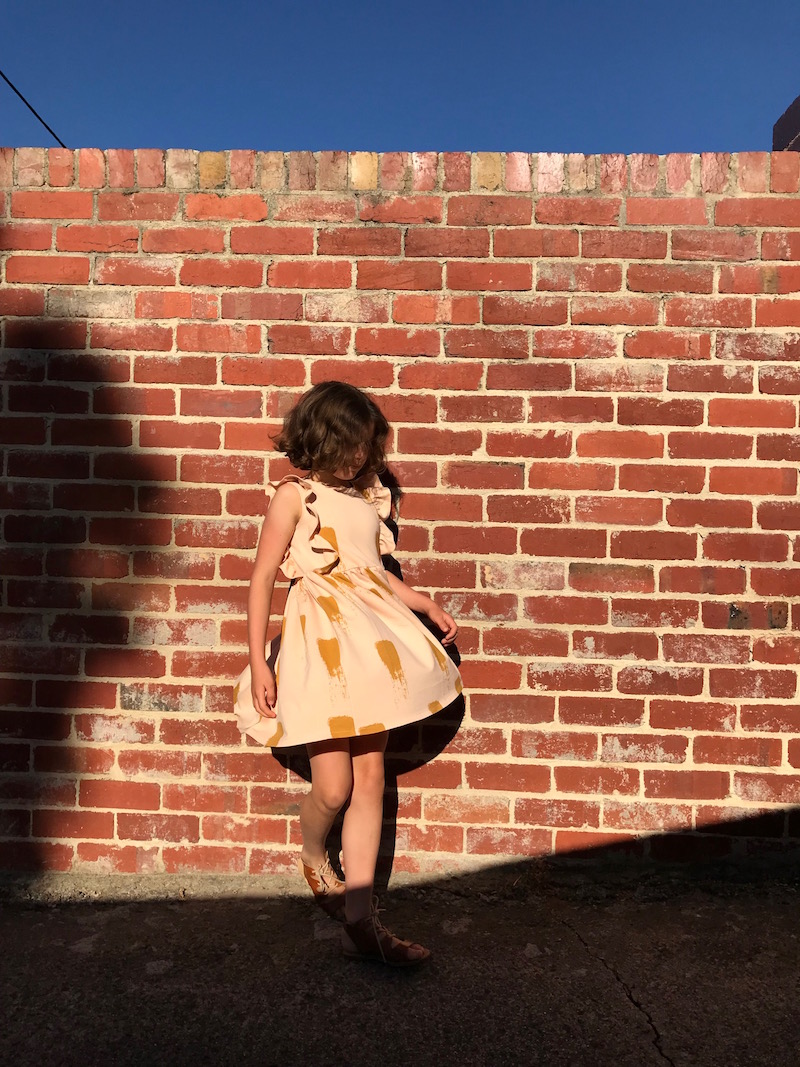
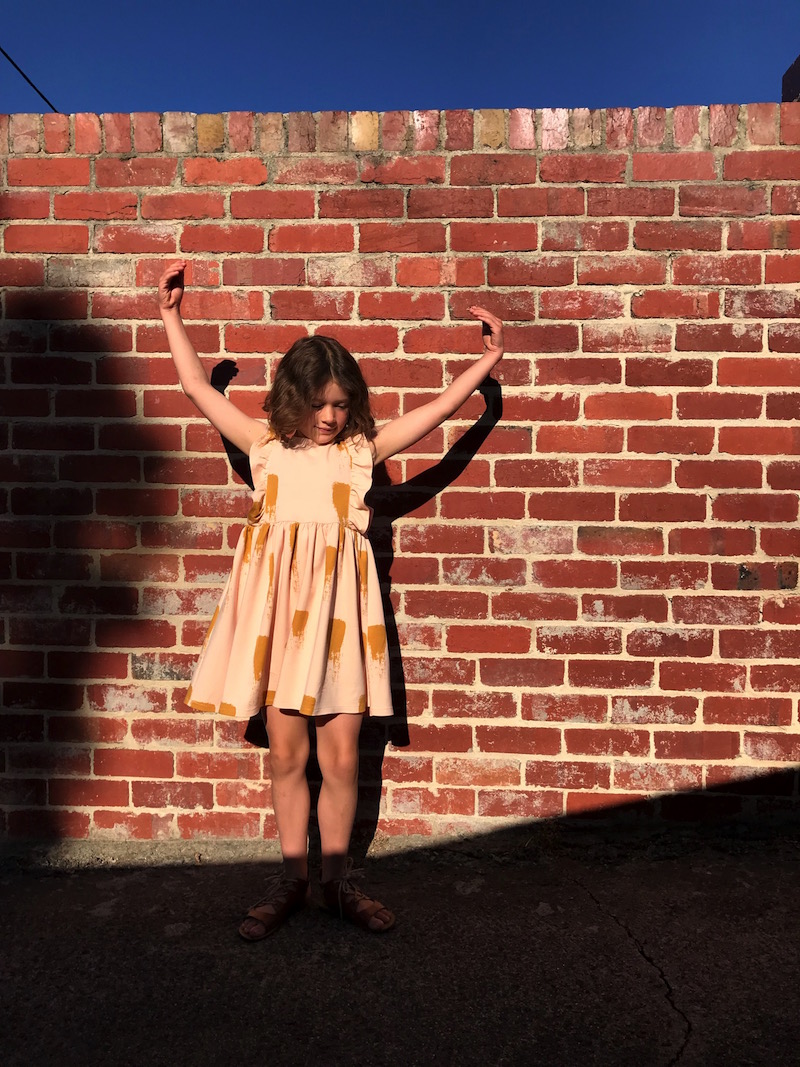
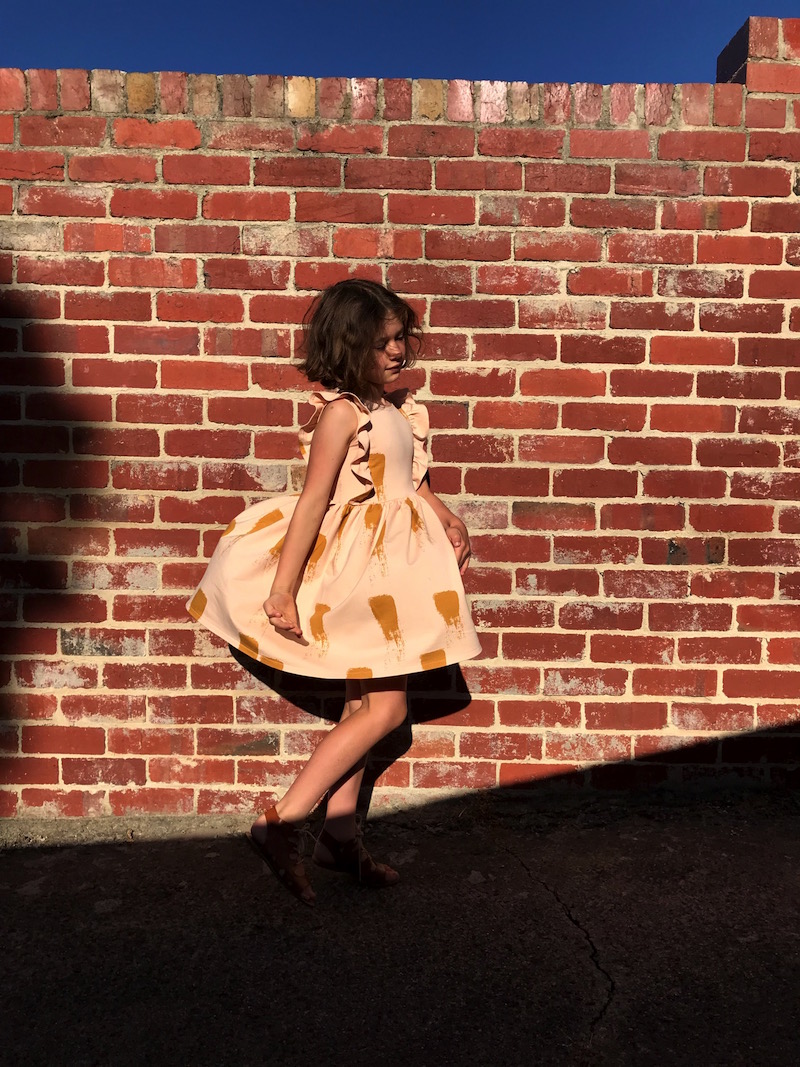
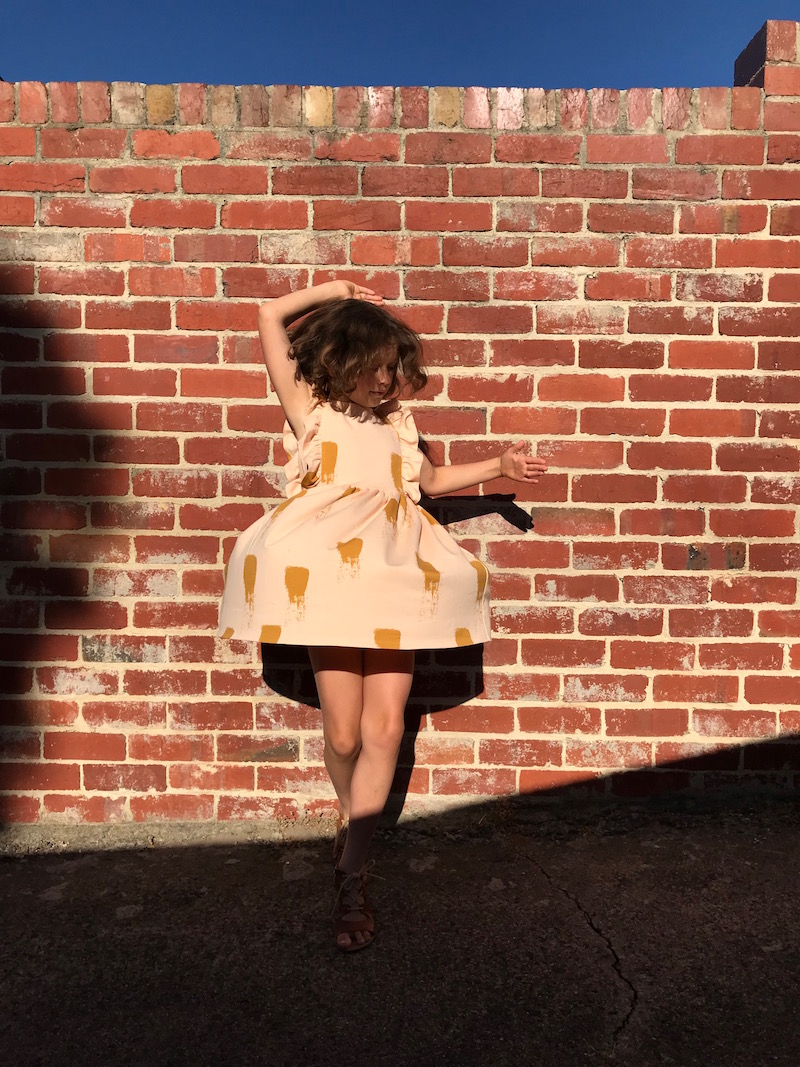
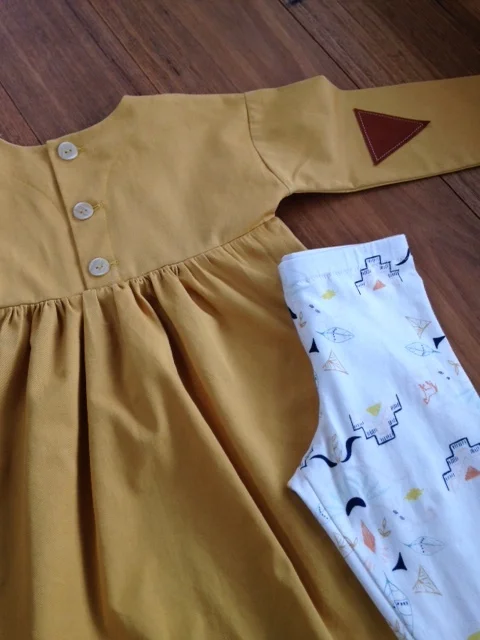
There will certainly be more Millie Dresses in our future.   I've already got a long sleeved version planned for autumn in this lovely April Rhodes fabric.  Any dress that makes you want to dance and twirl is a winner in my opinion! (Click through the images above to see more dancing and twirling!)

If you'd like to see more Millie Dresses go and take a look at the beautiful creations by the other lovelies on the Millie Dress Blog Tour:

Kneesocks and Goldilocks | Just Add Fabric | Van Jansen

Groovy Baby and Mama | La Folie Sewing Booth | My Petite Sophie

See You at Six French Terry Groove Dress

I thought all of my dreams had come true when Maaike from MaaiDesign contacted me and asked if I'd like to play with some of her beautiful, beautiful fabrics!  I was completely spoiled for choice but eventually chose to make this amazingly soft, completely adorable, beach / swim cover up from the fish print of this See You at Six french terry

I'm sharing lots more photos and a few more ramblings over at MaaiDesign today. Go and take a look and say 'hello'!

Groove Dress See You at Six French Terry Fish 1.JPG

Arizona After Blog Tour

Arizona After Blog Tour Hoppe Jumpsuit in Ojos Smoke knit

Last year I decided to treat myself to a weekend away in Sydney to attend some workshops that April Rhodes was teaching.  It was a wonderful weekend, so fun and inspiring. I have always loved April’s fabric (something about the colours and the designs just speaks to me and makes me want to, well… MAKE!)  but since meeting her I couldn’t help but also love April herself -  this lady has such a huge heart that it is practically impossible not to. 

April has just released TWO (!) new fabric collections; Arizona After, (a beautiful extension of her first fabric line - Arizona), and Heritage - a collection of knits and rayons inspired by her family’s history and roots.  You don’t need to hear her talk about the meaning behind these fabrics (although you should - there are some wonderful stories behind them) to see that she has poured her heart and soul into these designs.

I have to admit that for me one of the most exciting thing about these new collections is the number of garment fabrics.  I also love how well the prints work for both adults and children's clothing.  I’m going to be begging for more of her designs in rayons and knits in future!

Arizona After Blog Tour Hoppe Jumpsuit in Ojos Smoke knit

For today though, I sewed up a Hoppe Jumpsuit by Straightgrain in the Ojos Smoke knit for Ella and it was a massive hit, both with the girl and with me.  The fabric is lovely to work with and is so soft to wear.  The Hoppe Jumpsuit is also a really satisfying pattern to sew.  It comes together so quickly.  I actually can’t stop making them (I’ve made 3 already and have more on the cards.)

I made a toile of View B (no pleat) to test the fit (a size 8 skinny for my rather-tall-just-turned-7 year old) and while the toile fits well I think that View A (with the diagonal front pleat) makes it seem just a little too long in the body.  If I were to sew another for her I might go down a size and lengthen the legs for her instead.

Arizona After Blog Tour Hoppe Jumpsuit in Ojos Smoke knit

The Hoppe Jumpsuit is just so easy to move in, and perfect for active little people.  It seemed only right to thoroughly put it through its paces while taking photographs so we headed to our new favourite place to play – a treehouse that someone has built by the creek near our house. It can be a besieged fort or a pirate ship, a secret hideout or a nest, a palace or a treehouse - and is such a great place to let little bodies and imaginations run wild.  

Arizona After Blog Tour Hoppe Jumpsuit in Ojos Smoke knit

Make sure to check back on April’s blog and Instagram all throughout July for the up-to-date info on the Blog Tour.

Next up will be the ever wonderful Mr Domestic, followed by a final Instagram loop with more amazing prizes to be won!

P.S. Don’t forget to tag all of your makes with #heritagefabrics and #arizonaafterfabrics. Happy Sewing!

Fabric was provided to me by April Rhodes but all opinions are my own.

Reindeer Mask Tutorial - Bonus Pattern Piece

Reindeer Mask Tutorial

Can you believe we’re halfway through November, moreover, that it’s only 5 weeks until the Silly Season starts?!  I can’t, but that’s mostly because I live in topsy turvy land these days.  I’ve been in Australia for 12 years now but I still can’t get used to Christmas and Spring occurring at the same time.  I really need those environmental clues of the Northern Hemisphere, the autumn leaves falling, the nights drawing in, the chill in the air, to get me into the christmas spirit.  I pine for snow and log fires, sledding and hot chocolate, mittens and hot water bottles.

That’s not to say that I don’t enjoy a hot christmas.  It’s a lovely holiday here, full of light and the joys of early summer.  Little girls in white dresses, cherries and stone fruit, seafood and cocktails, bright sunshine and cool breezes.  We throw open all the doors and lounge around in the garden, enjoying balmy evenings under twinkling fairy lights.

Nonetheless, I do find that it requires more of a conscious effort on my part to make December feel festive, and because I am determined that my children should find it as magical as I remember the holidays from my childhood being I tend to overcompensate by going all out with the decorations, music, christmas craft activities, and, of course, handmade gifts.

One of my favourite Christmassy things to make are these little Reindeer masks. I’m heading to Swagger Child Design Market this Sunday so I have been busy stocking up on them, and today I’m offering you a free pattern piece so that you can make them too.  The cute little fawn in my Woodland Creatures Sewing Pattern can be transformed into a festive Reindeer with the addition of these antlers.  Download the pattern extension piece here and scroll down for the tutorial.  If you don’t have a copy of the Woodland Creatures PDF and would like one then you can purchase it here.

Tutorial:

1. Download the bonus pattern pieces and print out.  Make sure that you set your print settings to 100% or select ‘no scaling’.  Measure the 1” square on the page to check that it has printed correctly.

2. Cut out the pattern pieces and pin them to a double layer of felt.  Cut around each piece and then sew the two layers together, sewing 5mm (¼”) from the edge.

Reindeer Mask

TIP:  For a neater finish and an easier time sewing, draw around your pattern pieces while they are pinned to the felt.  You will need a white marker or chalk pen to do this on the dark brown felt.  DO NOT cut the felt out.

Instead sew 5mm (1/4”) inside your drawn line and then cut along the white line once you have sewn the two layers together.

Doing it this way stops the felt from shifting as you sew which can be a particular problem when sewing around curves.

Reindeer Mask Tutorial

3. Sew your fawn mask following instructions on the PDF pattern.  When you come to sew the 2 layers of the face together, sandwich each antler between the 2 face layers, positioning each approximately 1cm (½”) from the ear, and letting the base of the antler extend at least 1.5cm / ¾” into the mask.  Pin in place before sewing around the face.

Reindeer Mask

As you can see I use the same technique for sewing all of my masks i.e. I sew before cutting wherever possible - It's quicker and gives a much nicer finish!

Well, that's it.  You're done!

Happy Holidays.

Reindeer Mask

A Playtime Dress for Ella

Oliver + S Playtime Dress by Willow & Stitch

First make of Kids Clothes Week is complete!  I'm really happy with this lovely little dress.  The pattern is the Playtime Dress and leggings from Oliver + S.  I added these gorgeous little triangular leather elbow patches which I'm pretty sure I've seen somewhere (probably on Pinterest) and shamelessly copied, but I have no idea where I saw it!

Oliver + S Playtime Dress | By Willow & Stitch

The back view.  How cute are those elbows?!  And the gathers!  And the messy curls!

I really liked the topstitched peter pan collar, so much so that I'm almost wishing that I'd done it in more of contrasting colour - you almost can't see it!  (Also, don't judge me on my poor ironing skills...)

Oliver + S Playtime Dress | By Willow & Stitch
Love the silhouette of this dress..

Love the silhouette of this dress..

Molly (who has been renamed 'pillow' for some reason) came for a walk with us, as usual.  (Guess who had to carry her home though....)

Molly (who has been renamed 'pillow' for some reason) came for a walk with us, as usual.  (Guess who had to carry her home though....)

Both the dress and leggings were a big hit with the little lady.  Fortunately, because I cut into my precious Art Gallery Wanderer Knit for the leggings and would have been really annoyed if she hadn't liked them!  I actually cut them upside down (aagghh!) - I didn't realise the print was directional until I spotted those tiny little upside down horses.  So frustrating. Still, I'll probably be the only one who ever really notices!

I have pretty bad outfit envy with this one.  I also reeeeally want a pair of those gold toe capped shoes! 

I have pretty bad outfit envy with this one.  I also reeeeally want a pair of those gold toe capped shoes! 

Also, It's not technically a Kids Clothes Week make because I finished it last week but I finally got some nice pictures of the boy in his 'I solemnly swear I am up to no good' hoodie.  He refused to try it on for days, until I lost patience and practically wrestled him into it.  Once the tantrum was over he decided that actually he REALLY likes it. So much so that he has been sleeping in it and refusing to wear anything else.  Mama always knows best...!

Living up to the quote on his jumper!

Living up to the quote on his jumper!

I solemnly swear that I am up to no good | Harry potter quote stencilled sweater by Willow & Stitch

You May Also Like...

Wild Things - A New Safari Mask Sewing Pattern

Wild Things - Safari Felt Animal Mask PDF Sewing Pattern from Willow & Stitch

Are you ready for the kids to go totally wild?  Want to take a safari without ever leaving home?  Watch your backyard become the African savannah or turn the living room into a water hole with these lovely dress up masks.

This Wild Things Mask Sewing Pattern features patterns for Lion, Tiger, Giraffe, Zebra and Leopard masks.  You can even make the Leopard into a Snow Leopard for a mountain adventure. 

Wild Things - Leopard Felt Animal Mask PDF Sewing Pattern from Willow & Stitch

I'm so pleased with this pattern.  I think the designs are my favourites so far and I've put a lot of extra effort into the pattern and tutorials.  I've come up with a better (and easier) way of sewing the eye holes, and added whole sections explaining each technique used to make the masks.  There's information on how to resize them to fit dolls (or newborns), printing guides and notes on materials to use.

Wild Things - Snow Leopard Felt Animal Mask PDF Sewing Pattern from Willow & Stitch
Wild Things - Tiger Felt Animal Mask PDF Sewing Pattern from Willow & Stitch

The patterns are just as easy to follow as ever and are perfect for beginners.  They're quick to sew and make a perfect gift or stocking filler.  I think that practically all of the children Ella's class have gotten a couple of these masks for their birthday this year!  I had a particularly amusing / gratifying experience this last weekend when I took Ella to a 'Superheroes' party for one of her school friends (you can see pictures of her freezer paper stencilled Wonder Woman costume here) - I looked around the room and realised that about half of the kids were wearing masks that I had sewn and Ella had chosen to give to them for their birthday's.  It made me giggle and warmed my heart!

Wild Things - Lion and Zebra Felt Animal Mask PDF Sewing Pattern from Willow & Stitch

Anyway, back to these little wild things; we had so much fun shooting these pictures.  I can tell that these masks are going to get a lot of play time.  The leopard and snow leopard were particular favourites with my little testers. Anything that ROARs was a big hit too of course!  (Any excuse to make a lot of noise really!)

Roooooaaaar!

Roooooaaaar!

Wild Things - Giraffe Felt Animal Mask PDF Sewing Pattern from Willow & Stitch

As with all of my other PDF Mask Sewing Patterns this one contains bonus printables of all of the masks.  You can print these at home onto card then let the kids colour, paint or decorate them however they like.  Whey they're finished you simply cut them out and thread them with elastic.  It's one of our favourite rainy day activities and is also great as a birthday party craft activity.

Colour...

Colour...

Cut...

Cut...

Play!

Play!

To celebrate the pattern release, I'm offering free copies of not only this pattern but the ENTIRE collection of Willow & Stitch mask patterns to two lucky readers.  One here and one over on Instagram.  You are welcome to enter both giveaways as many times as you like.  Good luck!

Freezer Paper Stencilling

Freezer Paper Stencilling - Wonderwoman

Is it a bird?  Is it a plane?  No! It's Wonder Woman!  Someone is very pleased with my first efforts at Freezer Paper Stencilling!  Ella had a superhero party this weekend so we dug out one of the Wonder Woman headbands from my Etsy store stock, rustled up a blue star spangled skirt and jazzed up an old red T-Shirt by adding the Wonder Woman logo.

The Try Something New Every Month theme for July was 'Yarn' which I obviously didn't stick to.  I had intended to have a go at macrame but didn't manage to get organised in time so that's going to be next month's project instead - I've got grand plans for that one!

Instead I decided to have a go at Freezer paper stencilling which is one of those things that I have been meaning to try forever so it was great to finally have a reason to do it.  The freezer paper really is pretty amazing - which is fortunate really given how ridiculously difficult it is to get hold of here in Australia.  I had no luck in 3 of my local craft / fabric stores and then spent what felt like an eternity on the phone to another trying to get them to understand exactly what I wanted and then being passed from department to department while they tried to figure out whether they actually had any....  Still, we got there in the end and I bought a ton of it so that I hopefully never have to go through that palarver again!

Superheroes are very serious...

Superheroes are very serious...

Check out that awesomely wide gold elastic waistband - thanks Jimmy Buttons!

Check out that awesomely wide gold elastic waistband - thanks Jimmy Buttons!

Freezer Paper Stencilling - Wonderwoman

Having got the hang of Stencilling I decided to go for something wildly ambitious, because, well I'm ridiculous and I fell completely in love with this illustrated quote from Harry Potter by Rachel White Art. 

I spent about 2 hours cutting this one out and then managed to stuff it up in several different ways!  Firstly I melted my lovely merino wool while ironing on the freezer paper because I accidentally left my iron on very hot.  So, I had to try to peel the freezer paper off and reaffix it to a new piece (It took forever to cut out so I wasn't about to start again!) Consequently it didn't adhere quite as well as it should have and I got a little bleeding under the paper in places.

I solemnly swear I am up to no good hoodie - freezer paper stencilling

 I also used 3 coats of paint which was too much and made it really quite difficult to pull all the fiddly little bits around the letters off.  Still, I got there in the end!

The pattern was just a generic pullover pattern from an old Ottobre Magazine which I modified to give sleeve cuffs and a waistband because, well, frankly I'm too lazy to be bothered with using the twin needle on my sewing machine to hem it!  I also added a hood (arguably to avoid having to do the neck binding) but also because I really wanted to have a hood on it.

I can't help but think that this one was more for me than for the boy, but I did think the quote was very apt for such a cheeky little monkey!  Being the cheeky monkey that he is however, the little toad refused flat out to put it on.  This is his standard approach to jumpers at the moment but he usually comes up with some meandering excuse like 'I  don't like red, I only like blue' or 'I don't want to wear it if it used to be so and so's' (the vast majority of his clothes are hand-me-downs). It was partly this which led me to make him a jumper in the first place - my logic being that if I made something especially for him, in a colour that i know he likes, he surely won't have any problems with wearing it, right?

WRONG.

What I failed to take into account with all my well applied logic, was that my darling 4 year old exists beyond the realms of reason, in a world where 'I don't want to try it on now, I want to try it on next Wednesday' is a perfectly valid argument and no amount of persuasion, bribery or threatening is going to change his mind.  So.  Here are some pretty flatlay photos for you.... I give up, I'm going to throw myself on the sofa and watch Outlander.  Good night. xx

I solemnly swear I am up to no good hoodie - freezer paper stencilling

You May Also Like...

Doll Costumes | How to scale dress up masks to fit any size doll

Doll Costume | Batman Mask by Willow & Stitch
Doll Costume | Spiderman Mask by Willow & Stitch

Aren't these just the cutest?  One of my customers gave me the idea for scaling my mask patterns to fit dolls and I think it is just brilliant!

I'm making these doll costumes as part of the children's Christmas presents, I know they're going to love involving their little buddies in their current favourite games of 'superheroes' and 'rescuing'! 

Doll Costume | Wonderwoman Headband by Willow & Stitch

To scale the masks to fit your doll is very easy.  The trickiest part is working out the factor you need to scale by.  All you need to do is measure the doll's face to the width that you want the mask to fit.  Max and Molly's faces were approximately 10cm wide.  Next measure the width of one of the mask patterns that you want to scale.  The batman mask was about 18cm wide.  

Scaling masks to create doll costumes

To find the factor that you need to scale by, simply divide the width of the doll's face by the width of the mask and multiply the answer by 100:

10 / 18 = 0.55 

0.55 x 100 = 55%

You only need to do this once for each doll that you are sewing for.  The scale will remain the same for all masks for that doll.  

Re-print your mask pattern, but when you get to the print settings screen, select 'Custom Scale' and enter the scale that you calculated above.  I am scaling to 55%:

Once your pattern pieces are printed you can sew the mask as usual according to the directions.  You will, of course, need to adjust the length of the elastic to suit the doll's head.

If you want to try this then you can use the free batman mask pattern HERE or you can purchase any of my mask pattern sets on Etsy.  There are currently Woodland Animals, Fairytale and Superhero Mask pattern sets available.  Spiderman and Wonderwoman are going to be part of the next pattern sets which I will release early next year.

I'm also going to be giving away patterns to 2 lucky readers as part of Sew Mama Sew's Giveaway Day so if you'd like to try your luck you can enter via the rafflecopter below.  Comment here and / or follow Willow & Stitch on Instagram or Facebook for extra chances to win!

Willow & Stitch Sewing Patterns

Thank you so much for stopping by.  I'd love for you to take a look around my site.  Check out the Patterns and Tutorials page for lots of free sewing patterns.  Don't forget to head back to Sew Mama Sew when you're finished so that you can enter lots more giveaways!

Here's hoping this festive season leaves you with a full belly and a full heart.

You May Also Like...

Christmas Sewing | Holiday Debut Blog Tour - a Blue Ridge Dress and Fishtail Kimono

Blue Ridge Dress | Sewn by Willow & Stitch

It's December already! (Is it just me or is this year simply FLYING by?!) Time to start dusting off the Christmas decorations, putting up the fairy lights, stuffing your face with mince pies and, most importantly, getting cracking with making some lovely new Christmas outfits!  This year I am lucky enough to be taking part in a pretty special blog tour which allows me to sew up these divine patterns.

Holiday Debut Blog Tour

The Holiday Debut Blog Tour is a celebration of three lovely and very talented new designers: Saskia Smith of The Wolf and the Tree, Gabriela Longfish of Chalk and Notch, and Holli Coats of Hello Holli, all of whom have released their first patterns this year.  They've invited 24 splendid sewing bloggers to create holiday themed outfits using their patterns: 

For our hot Australian Summer Christmas I made this lovely white embroidered cotton Blue Ridge Dress with a festive gold silk trim.  And because Melbourne weather can be temperamental at the best of times (and positively schizophrenic at the worst of times...) I also made a lovely soft lightweight blue knit Fishtail Kimono incase it's not quite as warm and sunny as I am hoping.

IMG_0763.jpgBlue Ridge Dress and Fishtail Kimono | Sewn by Willow & Stitch

Don't they look sweet just hanging there together?!  I love these colours together, very regal and perfect for a special occasion.

Blue Ridge Dress | Sewn by Willow & Stitch
Fishtail Kimono | Sewn by Willow & Stitch

I was totally blown away by the quality of these patterns.  They were absolutely spot on.  So professionally put together, beautifully illustrated and really easy to understand. Even the taping was easy.  Gabriella's Fishtail Kimono is a no trim pattern so you just print and stick which I loved.  The Blue Ridge Dress pattern was also really nicely laid out to minimise the number of pages that had to be stuck together.  

The construction of the Blue Ridge Dress is so clever, it was a new technique for me and gives a beautiful finish on the inside with absolutely no exposed seams and no need for hand stitching the bodice lining to the outer (yay!) It's almost like magic.  The pattern calls for french seams on the skirt sides which I actually omitted because the embroidery on my fabric was going to make a french seam too chunky for this lightweight, flowy fabric.  There were a few stages when I thought I was going to get stuck, but fortunately Holli has a fantastic sew along on her blog with some really helpful photos to help you get your head around the trickier steps.  She also has a really nifty way of making the bias strips that you need for binding the arms and neck!  

The Fishtail Kimono also came together really nicely (and quickly!)  I do wish I had made the effort to seek out some tricot fusible interfacing for the hem because I used regular interfacing and it's just a little stiff for this lightweight knit.  For the sleeves I just did a quick rolled hem. Have I mentioned how much I love my rolled hem foot?  It has changed. my. life. Seriously. Not having to double fold and press hems and burn your fingers over and over? Brilliant!

The little lady was, needless to say, VERY pleased with her new outfit.  She wouldn't leave me alone while I was sewing it and simply couldn't wait to try it on!  The fit was great.  I made the Blue Ridge Dress in a size 6 and the Fishtail Kimono in a M (6/7)  This little one is only 5 but she's pretty tall and I can't bear the thought of her growing out of my hand makes so I almost always err on the side of too big... In this case it worked out well and both fit well with room to grow!

Cue obligatory twirling photos..

Blue Ridge Dress and Fishtail Kimono | Sewn by Willow & Stitch

Seriously, I love that the things I sew for her always make her want to dance!  That's pretty much how I know whether I'm going to love a dress too - if I can't help myself from twirling when I put it on then I know it's going to be a winner.  Anyone with me on that one?

Blue Ridge Dress | Sewn by Willow & Stitch

No doubt I am going to seriously regret my choice of white fabric, especially as I know it'll probably get about 30 minutes wear before it's covered in cherry juice and grass stains!  I just can't help myself though - I love little girls dressed in white.  They look so angelic.  Perhaps I should buy shares in stain remover...

If you love these patterns as much as I do then you'll be pleased to know that Holli, Gabriella and Saskia will be giving away patterns on Instagram all week so be sure to follow them.  You can also check out the hashtag #holidaydebutblogtour to get a sneak peek at what everyone has been busy making.  There are also a whole heap of wonderful prizes to be won from the tour sponsors.  You can enter the Rafflecopter here:

Holiday Debut Blog Tour Giveaway Sponsors

Fabric Shops Gift Certificates:
$50 BWD Fabrics & Supplies | $50 Imagine Gnats | 20 EU Girl Charlee UK


Sewing Patterns:
Hello Holli-Blue Ridge Dress | The Wolf and the Tree-choice of pattern | Chalk and Notch-Fishtail Kimono | Baste+Gather-Copy of all patterns | True Bias-Men’s Hudson Pants | Jennuine Design-choice of pattern | Sew Sweetness-choice of pattern | Radiant Home Studios-Highland House Pattern | Paisley Roots- copy of all patterns | Atelier Louise-Silver Sans Sandal pattern | Tinman Pattern-choice of pattern | Pattern Pieces-Fun Tee Pattern | Lorelei Jayne-Tech Pouch pattern | Designs by Call Ajaire-choice of pattern | The Ruffled Stitch-Flower Stripe Top/Dress pattern | Petit a Petit Family-choice of 2 patterns


Gifts:
$25 Sew Sew Rachel

If you don't get lucky enough to win any, then don't dispair; all three designers are offering 20% off these patterns with the code HOLIDAY

Anyway, enough of my ramblings.  There are 24 very talented bloggers taking part in this blog tour, mixing up these 3 lovely patterns to create special Holiday outfits and I am so looking forward to seeing what they've made.  Make sure to click through to their pages and see what will no doubt be some utterly gorgeous clothes.  

Monday, Dec 7th: Willow & Stitch | East & Eden | In a manner of sewing Climbing the Willow
Tuesday, Dec 8th: Kaleidothought | Feathers Flights | Connected by a Thread | Call Ajaire
Wednesday, Dec 9th: Rebel & Malice | Free Notion | The Whole Sh-Bang | House of Estrela
Thursday, Dec 10th: Candice Ayala Cindy Parrett | Hi and Hello | Made by Toya
Friday, Dec 11th: Just Add Fabric | Conversas de Hermanas | Glitter+Wit | Sew Starly
Saturday, Dec 12th: Paisley Roots | Petit a Petit + family | Life With Zeke | Made by Sara

Thanks for stopping by and I hope your holidays are happy and bright and filled with handmade goodness!

Blue Ridge Dress and Fishtail Kimono | Sewn by Willow & Stitch

You May Also Like...