A Robin Hood outfit for Kid's Clothes Week

Robin Hood Costume | Willow & Stitch

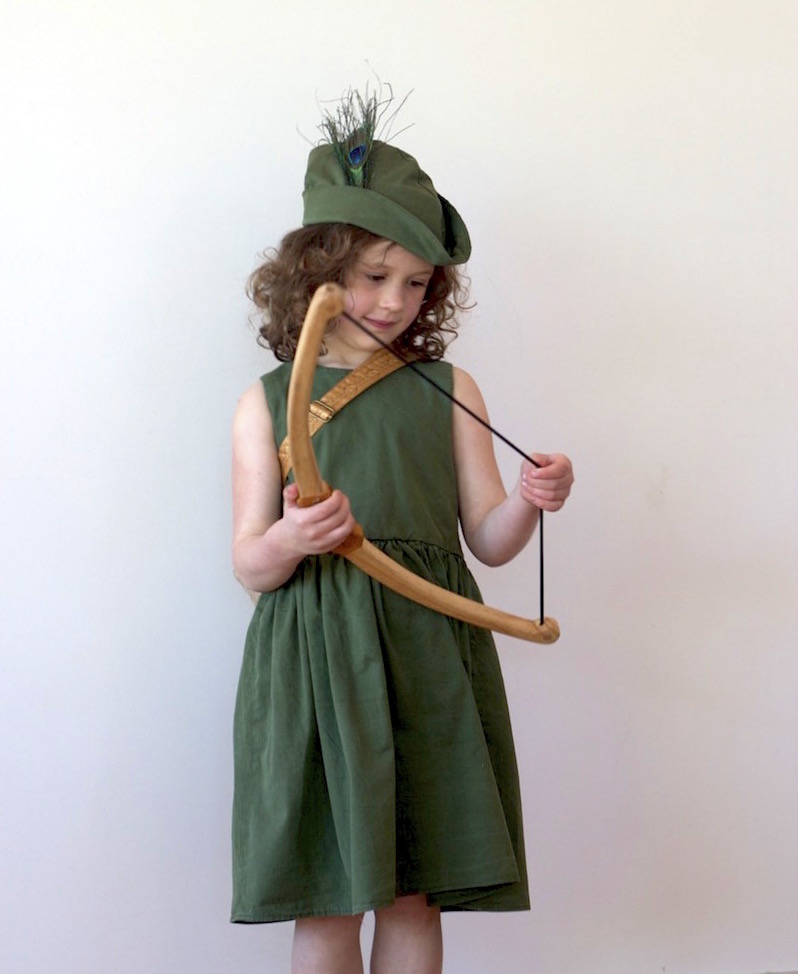
I first saw this toy bow and arrow on Instagram.  It's made by a little New Zealand company called Needle and Nail.  They make wooden toys and dolls and everything they create is simply gorgeous.  This little girl had been asking for a bow and arrow for her birthday pretty much all year.  She also wanted a 'Shooter Girl' outfit.  Fool that I am, I made her an Indian head dress. Wrong Mummy.  Wrong.  What she actually wanted, she explained later, was the GREEN shooter girl outfit.... sigh.

Ah well, Kid's Clothes Week seemed like a good opportunity to make one for her, and I have to say that, for once, my efforts were well rewarded - she was so thrilled with this outfit!  

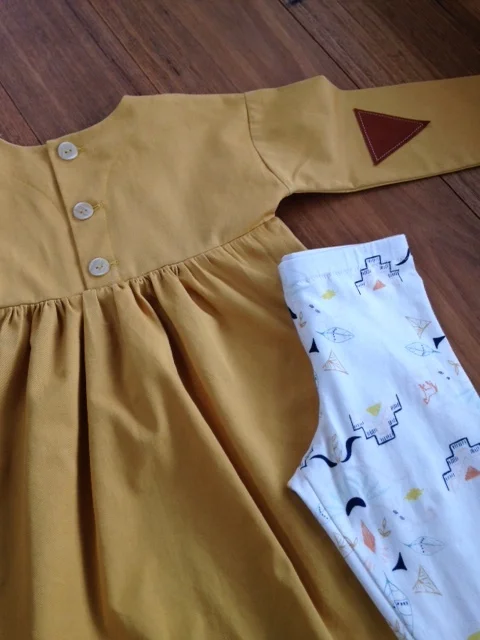
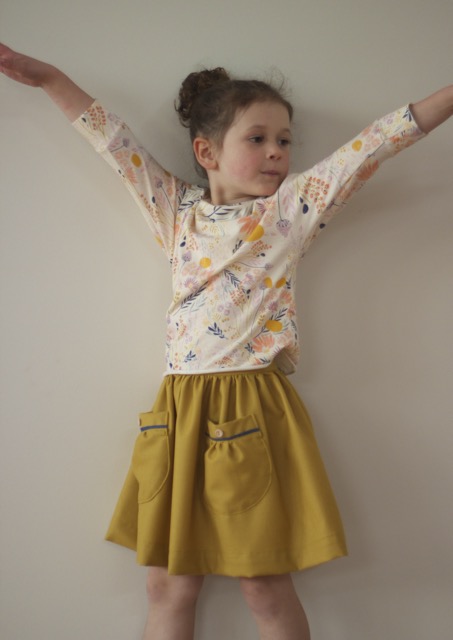
The dress is (another!) Geranium Dress with a lengthened bodice to drop the waist.  Apparently I am unable to count properly though because I went and sewed 5 button holes, despite having only bought 4 green buttons.  Idiot.  Never mind,  I'm just going to pretend that the single light green button is an intentional design feature. It works, right?!

Robin Hood Costume | Willow and Stitch

The hat was from a free pattern / tutorial that I found on Crafti Stacy.  I had to re-size it for a child, and I also added a lining so that it would look more finished. I thought it turned out really great - this kid needs to wear hats more often, I think she pulls it off well!

The quiver was my own design, I may get around to sharing a tutorial here one day.. I'll just add it to the never-ending 'To Do' list!  Let me know if you want it and I'll make more of an effort!

I don't know about you, but I can't think of bows and arrows without thinking of William Tell so we decided to have a little fun pretending to try and shoot an apple balanced on the top of her little brother's head:

"Look scared Jacob!"

Robin Hood Costume | Willow and Stitch

Disclaimer:  No children or apples were harmed in the taking of these photos...

You May Also Like...

An Awesome Kids Clothes Week / Halloween Giveaway!

In celebration of Kids Clothes Week (where the theme this season is 'Disguise') and with the imminent arrival of Halloween, I thought it was a good time to hold a giveaway.  I'm offering a full set of my PDF Felt Mask Sewing Patterns to one lucky reader!  The winner will get the Woodland Creatures (Owl, Bunny, Fox and Fawn), Fairytale (Unicorn, Princess and Knight) and Superheroes (Iron Man, Captain America and Hulk) Pattern sets.  

Felt Mask PDF Sewing Patterns | Willow & Stitch

These sewing patterns are super quick and easy to sew and all come with bonus free printable masks - great for a rainy day colouring / decorating activity.  To enter simply comment on this post, follow me on instagram or like the Willow & Stitch Facebook page!  Or do all 3 and get bonus entries! The winner will be drawn at random on Monday 26th October.  If you miss out or if you simply can't wait to get your hands on them then you can find them in my Etsy shop here.

In the meantime I'm going to go and get cracking with my Kids Clothes Week sewing!  I'm very excited to be a KCW Contributor this season.  If you missed my guest blog posts you can find my post on 'Disguised Details' here, and two silly posts on making the most of KCW and finding the time to sew here and here!

Are you taking part in Kids Clothes Week? What will you be sewing first?

You May Also Like...

Say 'Hello' to Bonnie! (And to a free doll nappy / diaper pattern) 

Little Amigo Doll in a mini Geranium Dress | Willow & Stitch

This is Bonnie.  She's a 'Little Amigo' doll from Meg McElwee's 'Growing up Sew Liberated' book.  It's one of my favourite sewing books - so many lovely play things to make for your kids.  I think I might have made them all.... This is the third Little Amigo doll that I've made.  'Max' and 'Molly' are two of my kid's most loved toys.  Our sweet little friend, Brea, always makes a bee line for them whenever she's here too, so it was a bit of a 'no-brainer' when it came to her 3rd birthday present - she simply had to have one too. 

For some reason I always feel compelled to make dolls in the image of the child that they're for - they're always thrilled when they notice that the doll has hair 'just like me!' and eyes 'just like mine!'  

I dressed Bonnie in a miniature Geranium Dress from Made-by-Rae and made her a necklace of tiny colourful pompoms.  She came with a little note which read:

Hello Brea,

My name is Bonnie.  I like cuddles and tea parties.  Will you look after me please?

Xx

P.S. Happy Birthday!

Little Amigo Doll in a mini Geranium Dress | Willow & Stitch

And of course no doll is complete without a set of nappies.  I made 3 so that she can have plenty of changes / coordinate her nappy with her outfit.  They are very quick and easy to make and a fantastic way to use up scraps.  Click on the image below to download your pattern pieces.

Free Doll Nappy / Diaper Pattern and Tutorial | Willow & Stitch

This nappy will fit a doll with a waist of up to 35 cm (14") down to about 21 cm (8").  For reference this doll is 45 cm (18")

You will need:

33 cm x 30 cm (13" x 12")  Cotton

33 cm x 30 cm (13" x 12")  Towelling / Fleece / Microfibre lining

2 x 2.5 cm (1") pieces of Velcro (optionally more for smaller sizes - see note on sizing at the end)


Instructions:

Cut 1 piece each from the cotton and from the lining.  Lay them one on top of the other with right sides together.

Free Doll Nappy / Diaper Pattern and Tutorial | Willow & Stitch

Stitch right around the edge of the nappy with a 1 cm (1/2") seam allowance.  Leave edges open between the notches on the long side of the nappy.

Free Doll Nappy / Diaper Pattern and Tutorial | Willow & Stitch

Clip corners and curved edges, taking care not to cut through your line of stitching.

Free Doll Nappy / Diaper Pattern and Tutorial | Willow & Stitch

Turn nappy to the right side using a knitting needle / chopstick to push out the corners.  Press, folding under the seam allowance at the turning hole.  Pin closed.

Free Doll Nappy / Diaper Pattern and Tutorial | Willow & Stitch

Edge stitch right around the nappy, sealing the turning hole as you go.  

Free Doll Nappy / Diaper Pattern and Tutorial | Willow & Stitch

Affix velcro to the nappy, placing the loops on the lining of the back (long) edge and positioning the velcro a few mm in from your edge stitching line.  Place hooks on the right (cotton) side of the nappy front (short edge) - again positioning them a few mm in from the edge stitching.  Sew all 4 pieces of velcro in place, sewing right around the edge twice for strength.

If you wish to make this nappy for a smaller doll than this one you will need to adjust the velcro accordingly.  The velcro loops on the back (lining) of the nappy can stay as above and then you can either sew a 16 cm (7") length of velcro right across the top of the front of the nappy, or you can cut a shorter length and simply sew a single piece in the middle of the top front of the nappy. 

Free Doll Nappy pattern and tutorial | Willow & Stitch

My kids will spend hours playing with their 'babies' and changing their nappies.  I'm always especially pleased when my little boy plays with 'Max' - his little amigo doll! I'm not sure why I love it so much, I think it's for the same reason that I love seeing my little girl playing with cars or playing superheros - It's always so nice to see them just enjoying what they're doing without any reference to gender stereotypes and with no preconceptions of that's a 'girl's toy' or a 'boy's game' and that's precisely how it should be - don't you think?  

You May Also Like...

Our Favourite Playdough Recipe

playdough

Today was a playdough kind of day.  Everyone was a little bit grumpy, everything was turning into an argument and we were on a downwards spiral.  So we made playdough, and as is often the case, everything began to turn around.  The kids love measuring out the ingredients, choosing colours and scents and kneeding the warm dough.  The kneeding is like a kind of therapy, It slows your heart and deepens your breathing. And then of course there are the endless play possibilities.  

This is our favourite playdough recipe.  It's quick and easy and makes beautiful silky soft playdough which will keep for months in an airtight container.


Ingredients:

2 cups plain flour

1 cup salt

1 tablespoon cream of tartar

1 tablespoon of oil

2 cups of water

Add all the dry ingredients to a saucepan.  Add the water and heat, stirring continuously until the mixture begins to thicken and pull away from the sides of the pan.  It can get to be a pretty good arm workout but continue to heat and stir for another minute or so.

Tip contents out onto the work surface, allow to cool a little and kneed until smooth.

playdough

Variations

Colour:  If you want to make only one colour, you can add a few drops of colouring to the water at the start.  If you want to make a couple of different colours then add the colouring to the dough once it has cooked and you have portioned it.

Scent:  I love adding essences to playdough to make it a truly sensory experience.  This time we added a teaspoon of coconut essence, but try adding lavender oil for a calming experience, or a tablespoon of coco powder (although that does increase the chance that the little ones are going to try to eat it!)

Sparkles:  Add a tablespoon of glitter to the dough.  Ella's favourite version of playdough is blue with silver sparkles - unsurprisingly she calls it 'Elsa playdough'.

Do you have a favourite playdough recipe?  Do you go for a cooked or no cook recipe?  Have any fun variations?

You May Also Like...

Fairytale Felt Mask Patterns now in my Etsy Store!

Willow and Stitch Fairytale Mask Pattern

New things in my Etsy Store today.  Most exciting is this fairytale mask pattern.  I've been meaning to finish it for aaaages, but you know....  

The PDF pattern includes a Princess Tiara, a Knight's Helmet and (best of all) a Unicorn.  You heard - a friggin' UNICORN!! Seriously, if I could walk around all day wearing a unicorn mask I absolutely would.  And now so can you.  

As always the pattern includes bonus printable masks so you can print them onto card stock and let your little ones colour them to their heart's content before they wear them.  I always think this would be a great party activity, or just a nice way to spend a rainy afternoon.  

Find them in my Etsy Store now for just a few dollars.

Unicorns BABY!!!!

Unicorns BABY!!!!

You May Also Like...

Kids Clothes Week - Going Japanese

Wildflower Kimono and Japanese Pants
Wildflower Kimono

It's Kids Clothes Week again! I'm not sure why I love Kid's Clothes Week so much; I mean it's not like I can't just sew for my kids whenever I feel like it; I think it's the feeling of participating in something bigger; of sharing my experiences and making connections with new people.

The theme this time is 'Travelling'; a bit of a tricky one don't you think?  I'm on a mission to sew only with fabric from my stash at the moment so going out and buying some 'travel' themed fabric is not an option.  Also, I don't really get much time to just sit down and sew for my kids so when I do I want to make sure that I'm sewing things that will get lots of use, and not just sew novelty items.

When I saw the Wildflower Kimono Cardigan from Striped Swallow Designs on Instagram this week I fell in love with it instantly and thought the Japanese style would fit perfectly with the 'Travelling' theme of Kid's Clothes Week.  It's a pretty great pattern, with no pieces to print and stick - It's just made out of rectangles! You've got to love that!

Dana at Sew Thrifty wrote a great post recently on how to decide whether a pattern is worth purchasing and this one definitely ticked several boxes for me; It comes in Sizes Newborn to Women's XXXL so I'm pretty sure that neither Ella or I will ever (hopefully!) grow out of It. Also, I love it so much that right now I want to make one for pretty much everyone I know!   I'm sure its going to be great value.  Actually, for the first time ever, I'm bummed that it's kids clothes week because all I want to do is sew about 10 for myself.  Next week is going to have to be Mama's Clothes Week...

Wildflower Kimono and Japanese Pants

The Wildflower Kimono was a pretty quick sew, I managed to cut the pieces and sew it in one evening, but most importantly It was a BIG hit with the girl who loved it because it's so big and soft and snuggly; perfect for winter in Australia.  She also discovered within about a nanosecond that if she spreads her arms she gets WINGS!!  Or she can be a superhero.  Or cover herself up entirely.  Big bonus points for that!

Wildflower Kimono

In keeping with the Japanese theme I decided to make this pair of Japanese Inspired pants from a (slightly modified) Ottobre Pattern.  I really loved how they turned out and thought that they looked great, but unfortunately the little lady had other ideas and instantly hated them.  I really had no idea why! Kids can be so irrational sometimes.  Fortunately they're also really easy to buy and I managed to bribe her with a few smarties to get these photos! Mwah ha ha ha ha ha....


Kids Clothes Week - Spider Tee for the Boy

Spider Tee

I found this amazing spider web fabric at my local fabric clearance store this week and thought it would be just perfect for the Kids Clothes Week Wild Things theme.  The pattern is modified from an Ottobre pattern, I just added a waist band to it to make it more like a sweater than a tee.  The neckline turned out a little wide but it just adds to the slouchy, comfy feel I think. 

Needless to say it was a big hit with Jacob who beamed when he saw it.  It immediately captured his imagination - he instantly turned into Spiderman - climbing, jumping, swinging, shooting webs from his wrists! Look at that happy face!

There were so many more things that wanted to get done during this Kids Clothes Week but as always there simply weren't enough hours in the day and I decided that I really needed to focus on one very special project instead! Details coming right up...

Woodland Creatures Felt Mask PDF Sewing Patterns

I'm on a roll!  My second PDF Felt Mask Pattern is up in the Willow and Stitch Etsy Shop. As with the Superhero Masks, the pattern also comes with free printables which can be printed onto card, then coloured or painted, and worn.  I think this would be a lovely activity for a children's birthday party or just a rainy day afternoon.  Check out my post on Superhero Masks for more details on how to use the printable masks.

Woodland Creatures Felt Mask PDF Sewing Pattern - Fawn, Fox, Owl and Bunny

I really love these little woodland creatures, although I'd be hard pressed to tell you which my favourite is.  Given the proximity to Easter, I think it might have to be the Bunny at the moment.  There's just something about the very word 'Woodland' which, for me, conjures up all sorts of fantastic and magical images.  It brings to mind stories of fairies and elves and toadstools, trees with secret hidden doors in their trunks.  Images of tiny glades, dappled sunlight, spring flowers, babbling brooks.  The soft crunch of leaves and twigs underfoot, the stillness of the air, perfect quiet.  The damp earthy smell; wild garlic and Bluebells.  I could almost be there.  It makes me long for springtime in England. 

Superhero Mask PDF patterns now available!

I'm super excited to announce that the PDF patterns for my felt Superhero Masks are now available in my Etsy store.  Superheroes #1 includes patterns for Captain America, Iron Man and The Hulk.  

The PDF file is available for immediate download after checkout and includes a materials and supply list, illustrated step by step instructions in English, full size pattern pieces for each mask and hints and tips for a better finish.

Patterns are suitable for beginners, and are quick, easy and fun to make.

As an added bonus I have included free printable mask templates for each design.  These can be printed onto card, then coloured or painted and cut out to form a mask.  Perfect for rainy days or birthday parties.

For the Card masks you will need:

  • 200gsm Paper / Card (or heavier if your printer will accept it)
  • Paints, markers, crayons or pencils.
  • Elastic string
  • A hole punch or sharp point for making the elastic holes.

Print the cardboard template pages (select pages 10, 12 and 14) onto your card or paper. When printing be sure to print at full size (do not scale).  There is a 1 inch test square on each page which you can measure to check that patterns have printed at the right size.

Colour or paint the masks.

Imagine the masterpieces your own kids could create….

Imagine the masterpieces your own kids could create….

Cut around the edge of the mask and cut out the eye holes.

Punch holes in the positions marked on each side and thread elastic string through.  Adjust to the required length and tie off.

You're done! Superheroes are ready to go!