New Year, New Beginning

If you saw this previous blog post you’ll know that I recently undertook my first venture into wholesale.  There were a lot of things I learned during the processes and a few surprises too.  The most significant of which was the realisation that I have effectively been selling masks in my Etsy store at wholesale prices for the last year.

I was surprised to find that Seed were going to sell my masks for $29.95 each. While I don’t think it’s unreasonable for them to do this, it was a bit of a wake up call for me.  I couldn’t help wondering why they were happy to charge that much when I felt like I couldn’t.  If customers were happy to pay this price in Seed, surely they would be just as happy to pay the same amount, knowing that they were supporting a small handmade business rather than a large corporation?

Raising prices is actually something I have been considering for a while now, mainly because I would love to take the next step and begin to approach local toy shops to see whether they would like to stock my masks.  I haven't done this yet because I can’t afford to lower my wholesale price, and I can’t ask retailers to sell my masks at a higher price while undercutting them in my own Etsy store.


All of this has left me feeling very conflicted.  I need to raise my prices but I feel really bad about it, I feel like I’m cheating people by doing so.  I’m worried that I’ll be out-priced by cheap versions of the same thing on Etsy, I’m wondering how I convince people that what I’m making is of better quality and that it’s worth what I’m asking for it.  I feel rather like I’m saying that my time is worth more - that I’m worth more - than what I’m currently asking - and for me that’s an uncomfortable place to be.  But at the same time I also want to make a success of my business and I can’t do that if I’m cheating myself.

While all of this has been difficult to work through, I am glad in a way to have had my hand forced.  I am happy to have finally made a decision that I have been putting off for months and months.  It feels like a gamble, and I’m afraid that it won’t work, I’m afraid that customers will say ‘No, I’m not paying that - it’s not worth that much’, not only because I don’t want to fail, but because it would leave me feeling foolish for having had the audacity to believe that I - and my products - were worth more.  

So having babbled on and on for quite long enough now, here’s what I’ve decided to do:


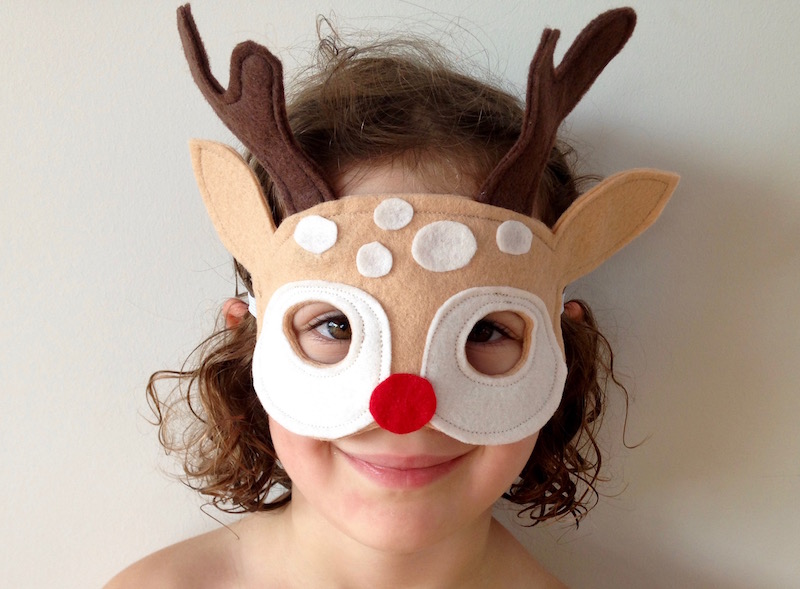
I am going to review the prices of all of my felt dress up masks.  They will be priced between AUD$19 and $24 depending on how detailed they are and how much work goes into them.  The new prices will come into effect as of January 2nd. So, consider this fair warning - if you were thinking of buying, get in quick before the price rise!

As an added bonus, I will be running a sale between Boxing day and New Year where you can get an extra 20% off with the code SWEET - this discount code will work for patterns too!  Please note that all orders placed during the sale will ship on January 2nd as we're going to spend New Year canoeing down a river, camping, reconnecting with nature and generally getting very grubby!

Finally I’d like to thank each and every one of you for all your support this year - whether it’s as a customer, a reader or a friend.  I couldn’t do it without you and want to wish you a very happy, healthy and joyful New Year.

Reindeer Mask Tutorial - Bonus Pattern Piece

Reindeer Mask Tutorial

Can you believe we’re halfway through November, moreover, that it’s only 5 weeks until the Silly Season starts?!  I can’t, but that’s mostly because I live in topsy turvy land these days.  I’ve been in Australia for 12 years now but I still can’t get used to Christmas and Spring occurring at the same time.  I really need those environmental clues of the Northern Hemisphere, the autumn leaves falling, the nights drawing in, the chill in the air, to get me into the christmas spirit.  I pine for snow and log fires, sledding and hot chocolate, mittens and hot water bottles.

That’s not to say that I don’t enjoy a hot christmas.  It’s a lovely holiday here, full of light and the joys of early summer.  Little girls in white dresses, cherries and stone fruit, seafood and cocktails, bright sunshine and cool breezes.  We throw open all the doors and lounge around in the garden, enjoying balmy evenings under twinkling fairy lights.

Nonetheless, I do find that it requires more of a conscious effort on my part to make December feel festive, and because I am determined that my children should find it as magical as I remember the holidays from my childhood being I tend to overcompensate by going all out with the decorations, music, christmas craft activities, and, of course, handmade gifts.

One of my favourite Christmassy things to make are these little Reindeer masks. I’m heading to Swagger Child Design Market this Sunday so I have been busy stocking up on them, and today I’m offering you a free pattern piece so that you can make them too.  The cute little fawn in my Woodland Creatures Sewing Pattern can be transformed into a festive Reindeer with the addition of these antlers.  Download the pattern extension piece here and scroll down for the tutorial.  If you don’t have a copy of the Woodland Creatures PDF and would like one then you can purchase it here.

Tutorial:

1. Download the bonus pattern pieces and print out.  Make sure that you set your print settings to 100% or select ‘no scaling’.  Measure the 1” square on the page to check that it has printed correctly.

2. Cut out the pattern pieces and pin them to a double layer of felt.  Cut around each piece and then sew the two layers together, sewing 5mm (¼”) from the edge.

Reindeer Mask

TIP:  For a neater finish and an easier time sewing, draw around your pattern pieces while they are pinned to the felt.  You will need a white marker or chalk pen to do this on the dark brown felt.  DO NOT cut the felt out.

Instead sew 5mm (1/4”) inside your drawn line and then cut along the white line once you have sewn the two layers together.

Doing it this way stops the felt from shifting as you sew which can be a particular problem when sewing around curves.

Reindeer Mask Tutorial

3. Sew your fawn mask following instructions on the PDF pattern.  When you come to sew the 2 layers of the face together, sandwich each antler between the 2 face layers, positioning each approximately 1cm (½”) from the ear, and letting the base of the antler extend at least 1.5cm / ¾” into the mask.  Pin in place before sewing around the face.

Reindeer Mask

As you can see I use the same technique for sewing all of my masks i.e. I sew before cutting wherever possible - It's quicker and gives a much nicer finish!

Well, that's it.  You're done!

Happy Holidays.

Reindeer Mask

Fabric Basket Tutorial

Happy New Year!

Before Christmas fades into distant memory I thought it'd be nice to share a tutorial for one of my favourite handmade gifts this year; these lovely little fabric baskets.  They are very quick and easy to make and there is no pattern needed.  The baskets can be made any size - I like them with a 16cm diameter, but the hubby was asking if I could make some which were waste paper basket sized, which of course you could.

I think they are also really nice as a little nested set of 2 or 3, with each one a few centimetres bigger than the one before it.  The tops can be folded down once or twice depending on the contents of the basket.

Don't you love this fabric combination?  These are actually some bits that I had left over from the Sew Liberated 'Gathering Apron' which I made a few weeks ago for myself - I'll take some pictures and post that soon too.

For the baskets, you will need:

Linen or hessian fabric for the outer

Printed cotton for the lining

Heavy weight fusible interfacing


Step 1: Calculate measurements and cut pattern pieces:

Choose a bowl or plate which is roughly the diameter which you want for your baskets and use it as a template for the base of the basket. Cut one each from the outer, lining and interfacing.

As we will be working with 1cm seam allowances, the base of your basket will eventually have a diameter which is 2cm less than the circle you have cut. Calculate the circumference of your basket by multiplying the the diameter (minus 2) by Pi (3.14). Then add 2cm for the side seam allowance. If only my high school maths teacher could have pointed out that maths would be useful for sewing patterns I might have paid more attention…

For example, I drew around a bowl which had a diameter of 18cm.

My basket diameter is 18 - 2 = 16cm.

The circumference of my basket will need to be 16 x 3.14 = 50cm approx

Add 2cm seam allowances: 50 + 2 = 52cm

So I need to cut a side piece with a length of 52 cm.

The height of the sides will be 1.5 x diameter of finished base; 1.5 x 16 = 24cm. This gives the basket a nice height and allows for the sides to be folded over at the top.

So, for the sides cut 3 pieces measuring 52 x 24, one each from the outer, lining and interfacing.

Step 2: Affix the interfacing and sew the outer and lining baskets.

Using a hot iron with no steam, fuse the interfacing to the outer basket pieces. The linen / hessian tends to stretch significantly on the bias so the interfacing stabilises it as well as adding structure to the basket.

Working first with the basket outer pieces, fold the edge piece along its length to bring both short edges together with right sides facing. Sew along the short edges with a 1 cm seam to form a tube. Press seam open.

Join base to edges.  With right sides together, place the base inside the tube, aligning the edge of the circle with the edge of the tube. Join the base to the sides with a 1cm seam. Work slowly, pulling the base around to match the edge of the sides. Lift the presser foot frequently (leave the needle down to keep your work in place) to allow the fabric to relax back into place. Sew all the way around the base.

Watch out for stray crocodiles while doing this...

Trim seams to a few mm then repeat to form the basket lining.


Step 3; Join the lining and outer pieces.

Turn the basket lining to the right side and place it inside the outer piece, with right sides together.  Push the lining right into the outer, ensuring that the bottom seams align. The outer edges should match up. Sew around the top of the basket leaving a 5cm hole for turning. Backstitch at either side of the turning.  

Pull the basket to the right side, through the turning hole.  Push the lining into the outer and press the sides, folding the fabric at the turning hole to the inside.  Topstitch right around the top of the basket, sealing the hole.

Fold the top of the basket down to show the lining on the outside. 

I have deliberately left them un-ironed (which may or may not be a real word) because I love the way they almost look like crumpled paper bags.   What do you think?  Would you have a go at making these? I'd love to see how you got on.  What was your favourite handmade gift this year?